SeaNav Autopilot with OnWatch

Automatically follow your route with SeaNav’s autopilot mode. SeaNav can control Raymarine and Navico/B&G/Simrad/Lowrance auto tillers and helms to sail a SeaNav route. You can also use SeaNav on your iPhone or Apple Watch as a remote control for your Raymarine Tiller and Wheel Pilot
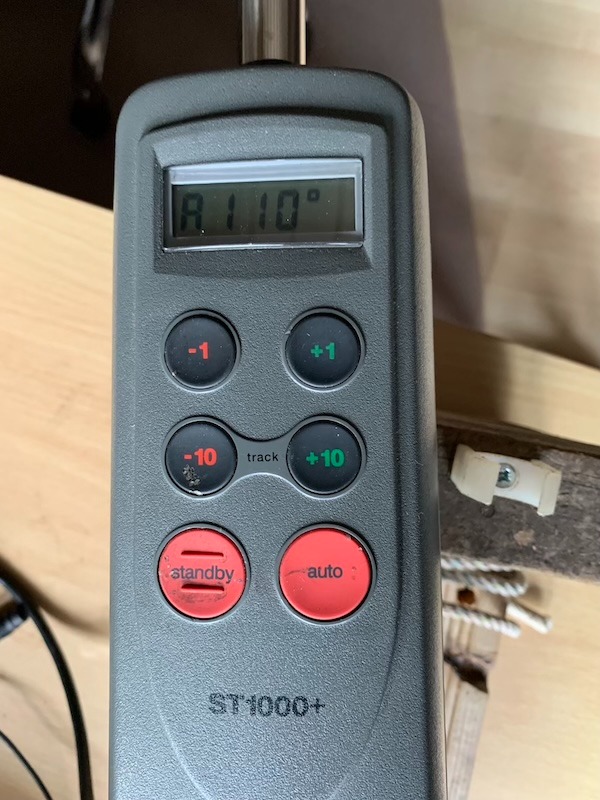
Here is a demonstration sailing a SeaNav demo route in the Pocket Mariner’s shore based lab with a Raymarine ST1000+ Tiller pilot.

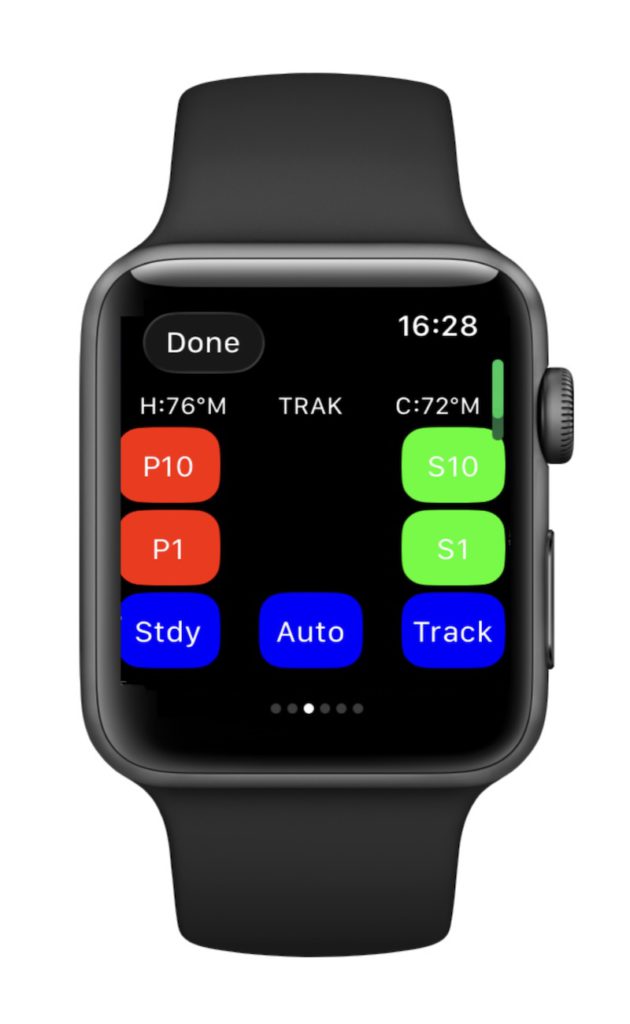
SeaNav running on an iPhone is connected to the Tiller pilot via SEATALK over Wifi using the OnWatch Wifi adapter. The current boat’s heading is 110° and we are in Auto mode on the Tiller pilot maintaining that heading.
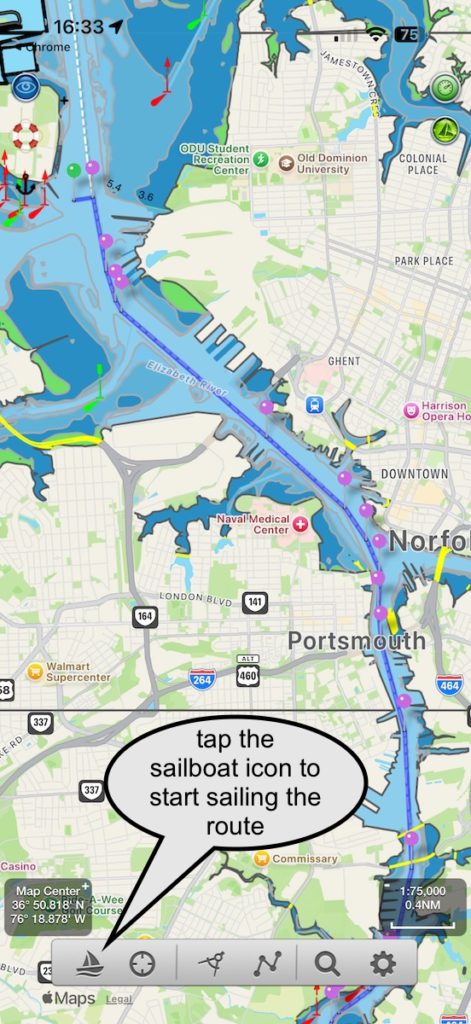
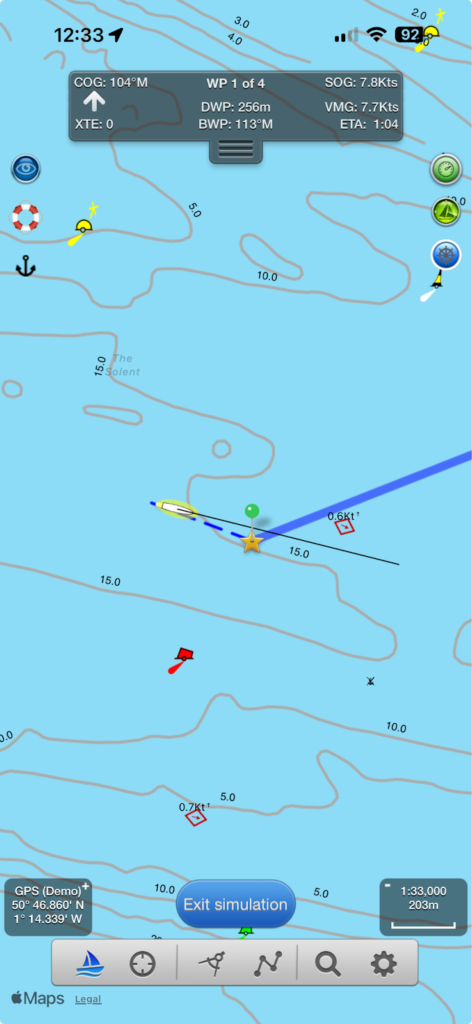
We start sailing the route in SeaNav by tapping the sailboat icon bottom left, note the BWP (Bearing to the first Waypoint is)  at the top centre of the screen is 113°.
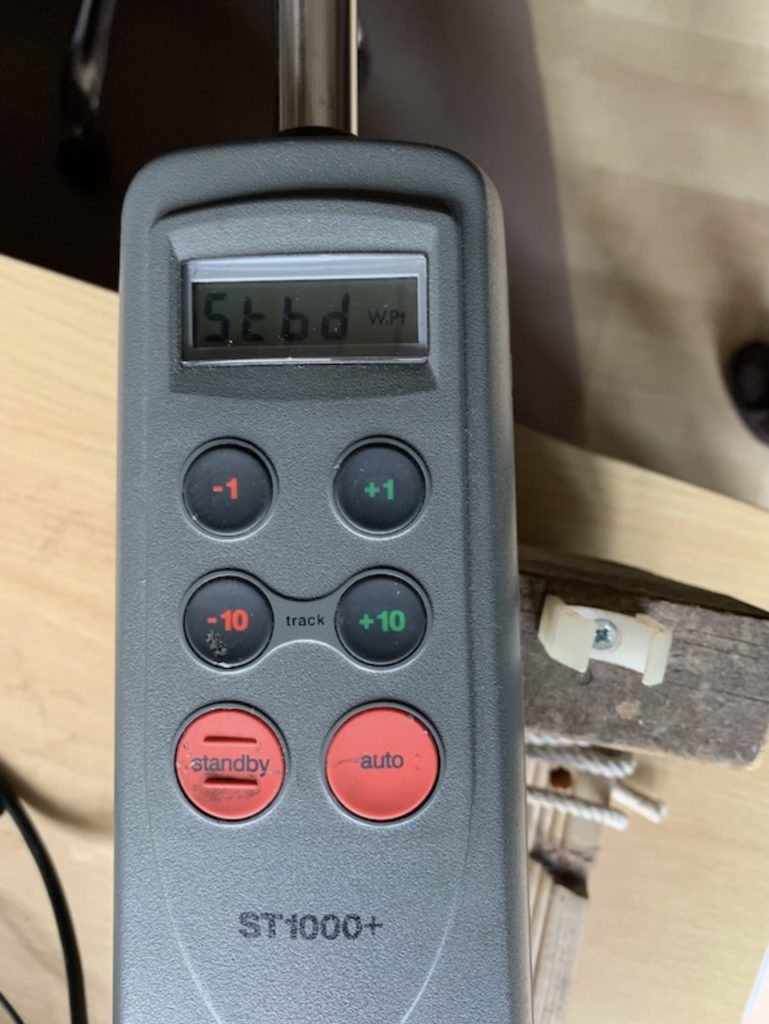
SeaNav tells the autopilot the course to steer to the first Waypoint from our current position. As the BWP is 113° and the boat  is currently sailing 110° the tiller pilot tells us it needs to change course (it beeps) and shows us which way it is going to turn;  to Starboard on a new course heading of 113°.
Press -10 and +10 together on the Tiller (Track) to accept the new course. The tiller pilot stops beeping and shows us the distance to the 1st Waypoint is now 0.1nm using the information from SeaNav.

We reach the 1st waypoint and SeaNav tells the tiller pilot we need to change course again to Waypoint 2. The tiller pilot sounds the Waypoint changed alert and shows us the new course , the direction it is going to turn (to port). Pressing Track again (-10 and +10 pressed at the same time) accepts the course change.

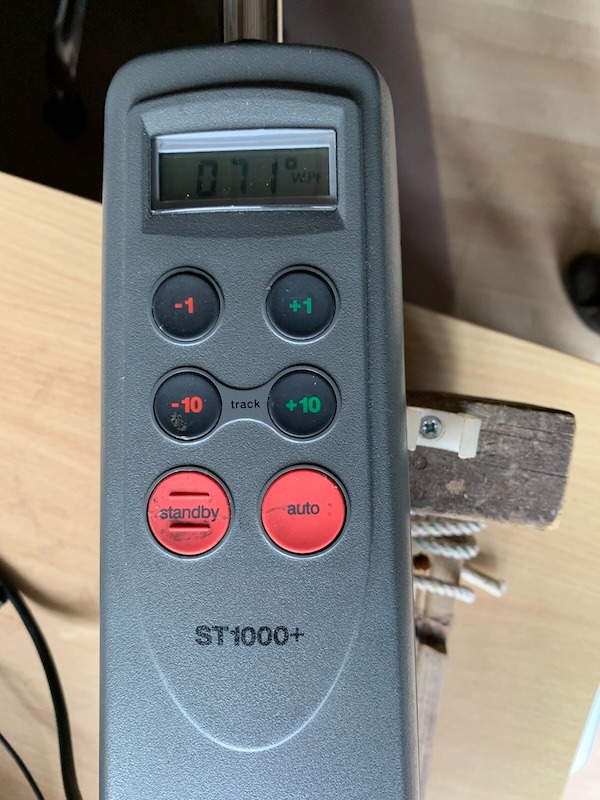
The tiller pilot stops beeping and changes our boat’s heading ( simulated by rotating the tiller pilot on the desktop)  until we are lined up with 71° (note the t in front of the course showing it is in tracking mode). The tiller display then continually cycles through the new course information showing us the course, off track error and distance to the second waypoint (DWP) 1.2nm updated by SeaNav as we sail towards waypoint 2.
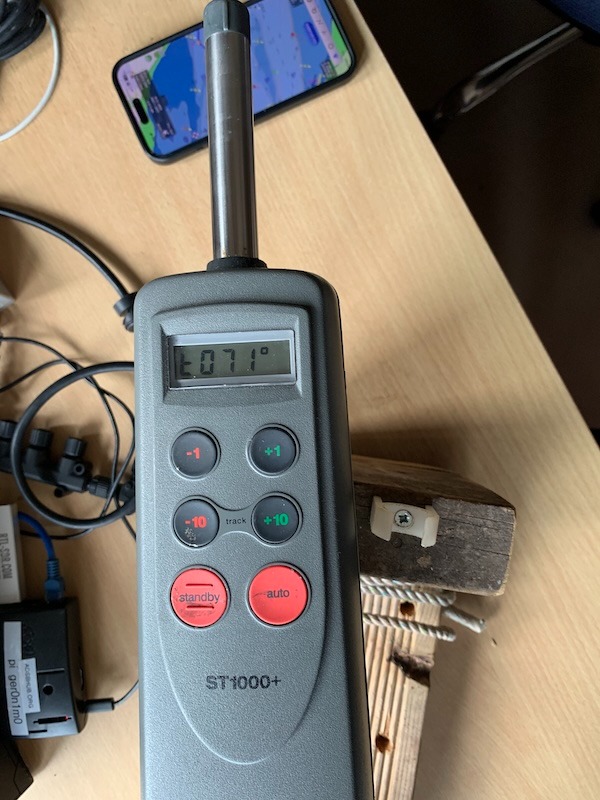
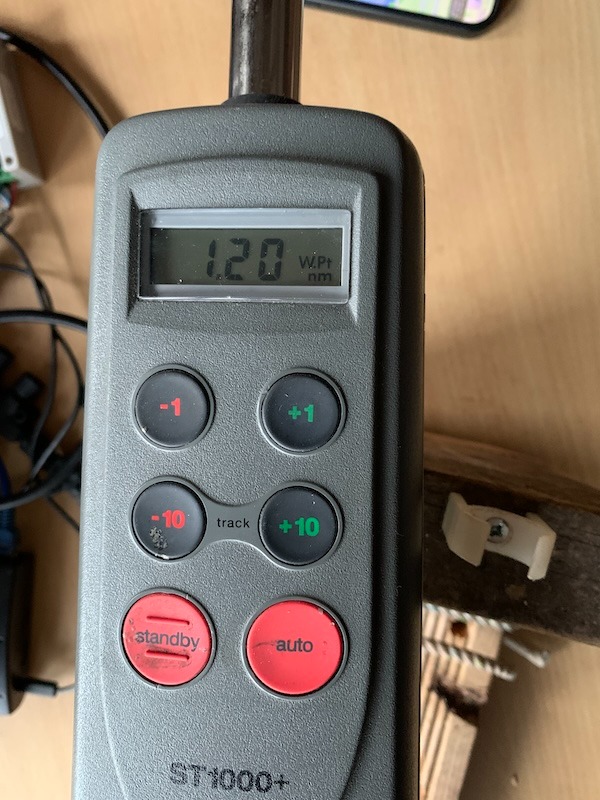
and here we are heading for Waypoint 2 in SeaNav. There is an optional advanced mode where SeaNav will automatically tell the Tiller to accept the new course without the need to Press the Track mode on the tiller – see below.
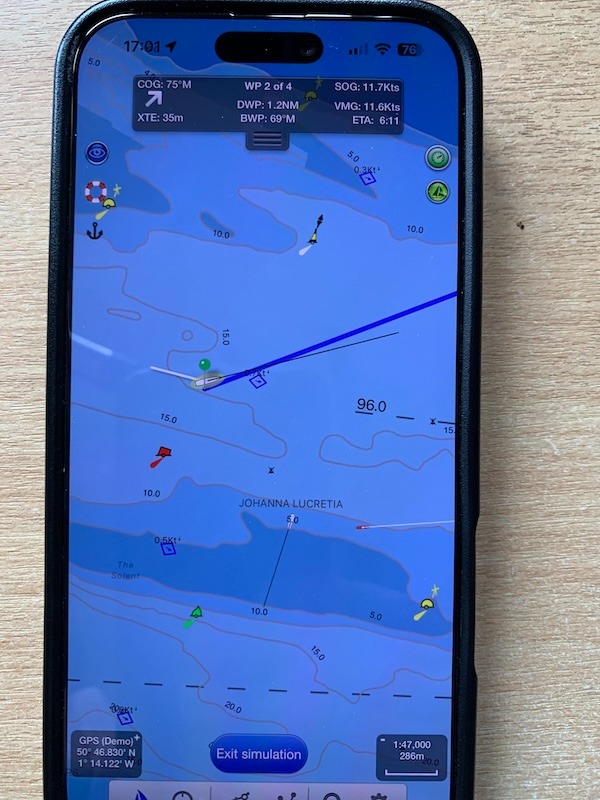
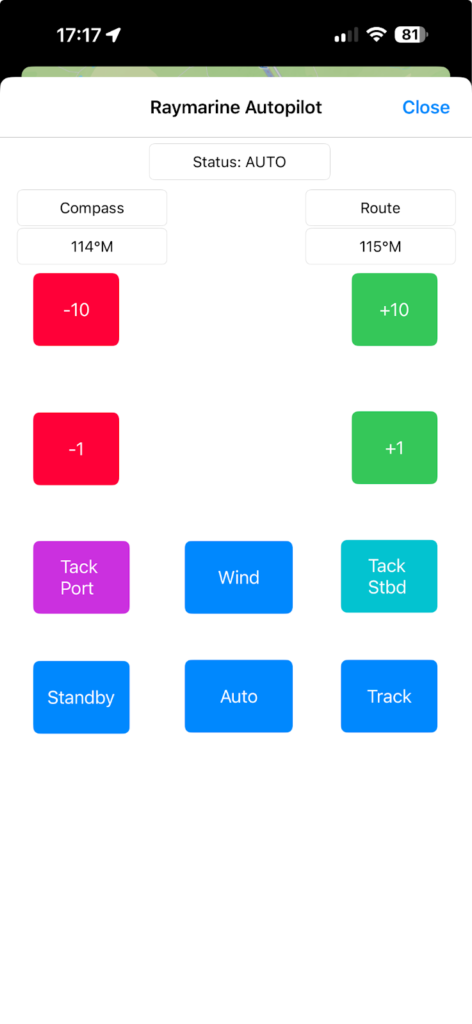
SeaNav can remotely control the Auto tiller buttons and view its status (tap the autohelm button towards the top right of the screen in SeaNav to show the remote control buttons and Autopilot status) :-
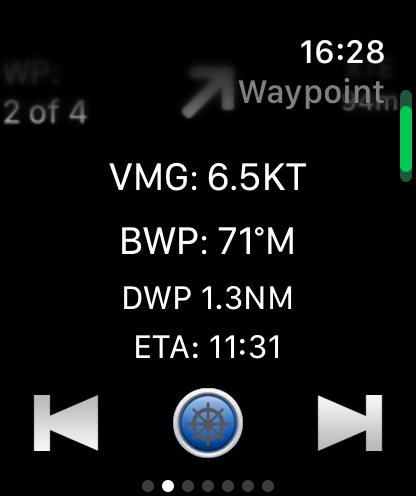
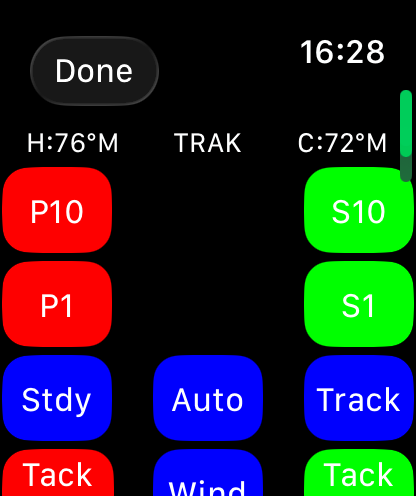
The SeaNav Apple Watch can also control the Raymarine AutoPilot. Tap the autopilot symbol (blue bottom centre) on the Waypoint watchface to view the AutoPilot status and controls:-
Setting up SeaNav to use a Raymarine AutoPilot with the OnWatch Wifi adapter.

Hardware setup

Raymarine ST1000+ and 2000+

Only 3 wires need to be connected, Yellow SeaTalk, 12V brown (+ve) and blue (-ve).

The Raymarine ST1000+/20000+ Tiller pilot has 5 wires in its connecting cable – brown, blue, yellow, green and white. 
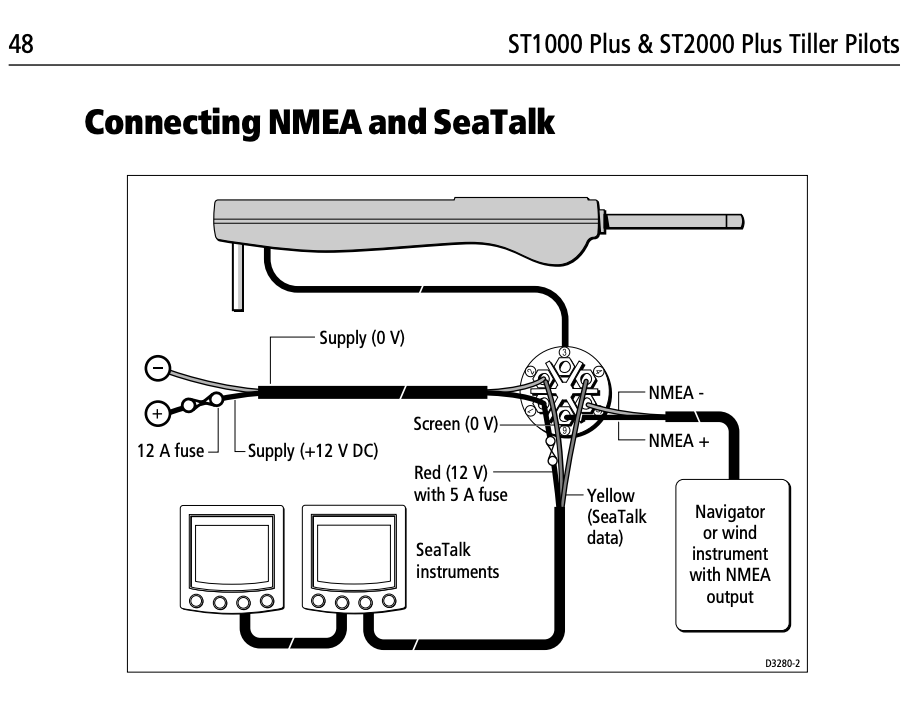
Connect the yellow SeaTalk wire/terminal(4)  from the Raymarine Autohelm/tiller to the Data terminal (far left) on the OnWatch device.

Connect 12V and GND on the OnWatch to the 12V brown (+ve) and blue (-ve) auto tiller power leads or boat supply (pin 1 +and 2 -). 

Raymarine ST4000+
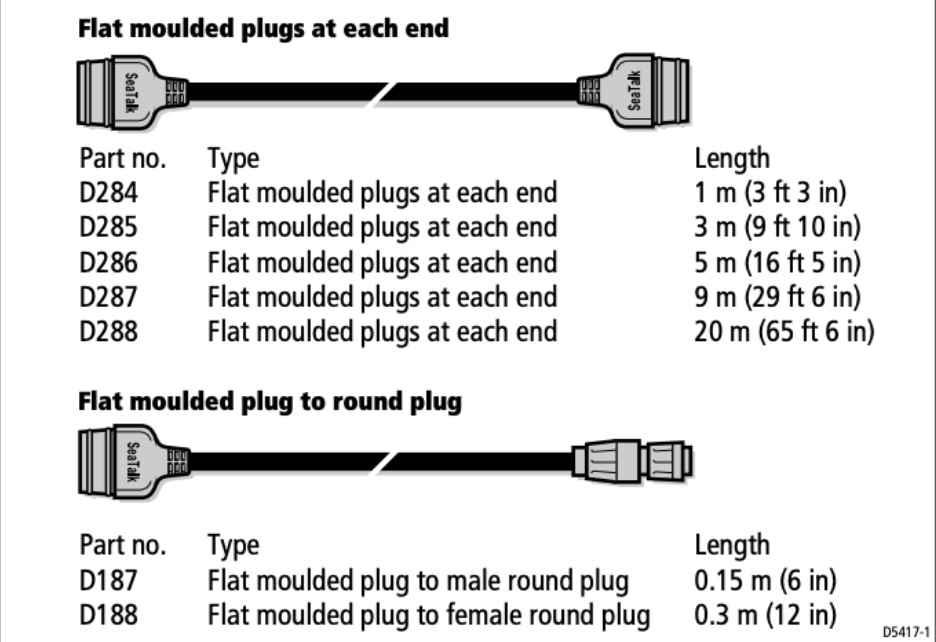
Connect the OnWatch Adapter to 12V and the SeaTalk bus using a SeaTalk cable from the control unit rear as above. The correct part number for the cable with a connector one end and bare wires the other is D229 (also Rul-4001-136-A). You can use a SeaTalk cable and cut a connector off one end. The SeaTalk cable data wire is yellow, the + and – 12V wires are usually red  (+ve) and black (-ve/gnd).

iPhone and SeaNav configuration

Set the iPhone to use the OnWatch wifi network and connect to it. (default password 12345678)
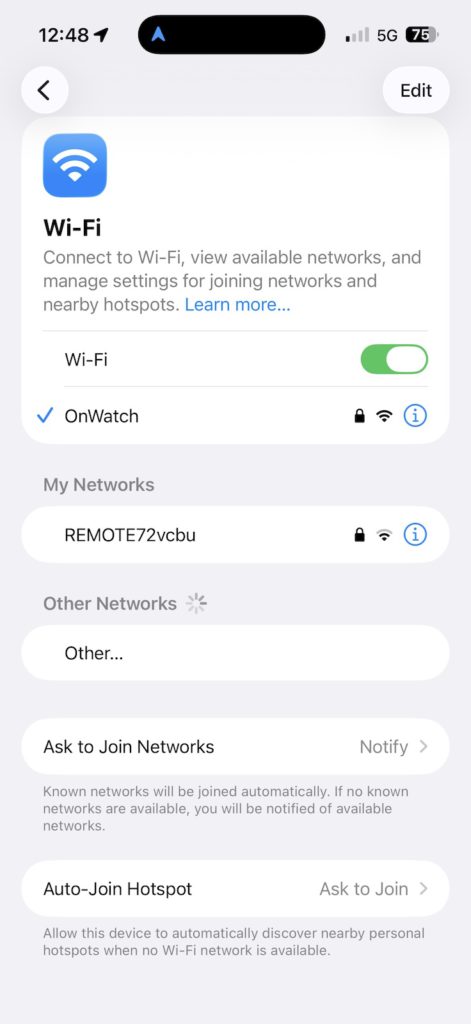
OnWatch Wifi

Now configure SeaNav to talk and listen to the AutoPilot. Go to Settings/AIS, GPS & NMEA Link .
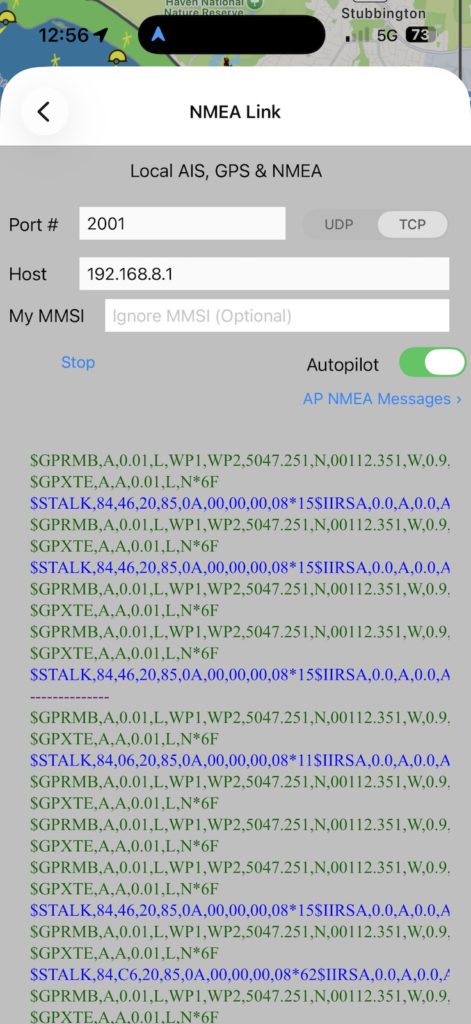
Screenshot

Configure it to use TCP to IP address 192.168.8.1 , port 2001 . Set the AutoPilot switch on. If the hardware is all connected up you can tap Start and should see live data from the AutoPilot. Blue for received messages and green for sent.

Back on the SeaNav chart view the Autopilot symbol top right should now be green and if you tap it you can see the Raymarine Autopilot status and remote controls.

You are now ready to sail a SeaNav route automatically. Make sure the Autopilot/tiller is in Auto mode and then just start sailing a route or to a point by tapping the Sailboat icon. Press Track mode on the Autopilot/tiller to start following the SeaNav route. The SeaNav autopilot should now be blue.
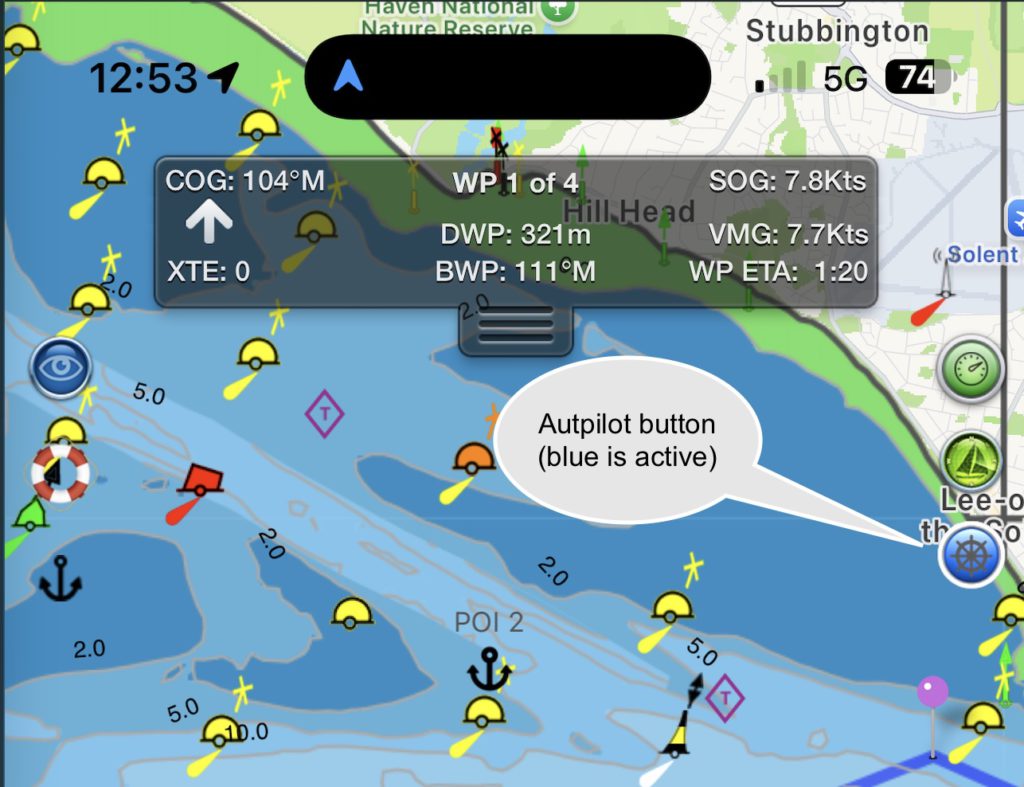
If you want to disconnect SeaNav from the Autopilot tiller/helm tap the Standby button on the autopilot. Re-connect to the SeaNav route by tapping the Auto button. To completely disconnect, turn off the Autopilot switch in SeaNav Settings/AIS, GPS & NMEA Link or stop the link.

AutoTrack

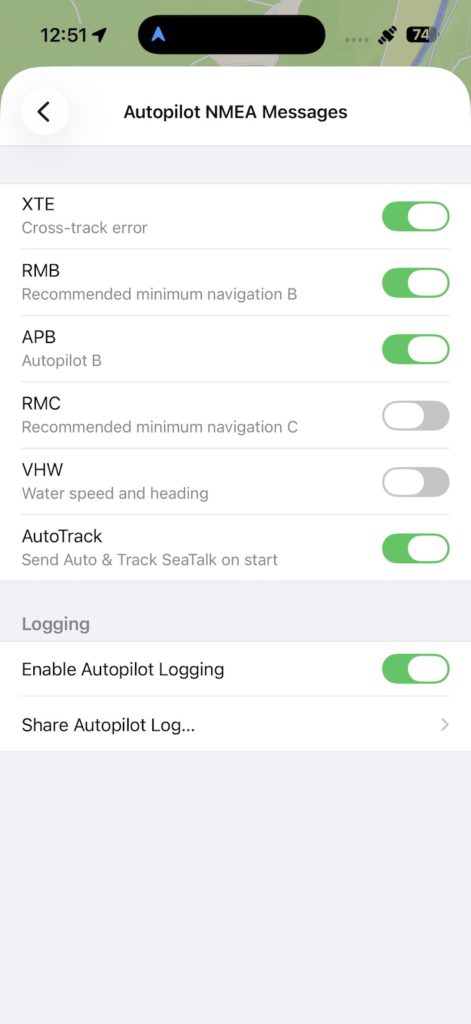
You can set SeaNav to automatically tell the Autopilot/tiller to accept new Waypoints. In Settings/AIS, GPS & NMEA Link tap the AP NMEA Messages button below the Autopilot switch. Then switch AutoTrack on. Now every time a waypoint is reached SeaNav will auto-confirm the waypoint change and you do not need to acknowledge it by pressing the Track buttons on the Auto tiller/pilot. Please use with care as unattended course changes could be un-safe.
Screenshot

SeaNav Autoroute

SeaNav “Autoroute” lets you quickly generate a route between end points based on depths and obstacles. Just set the start and end points and tap “autoroute”.

Most times these will match what an experienced navigator would manually place. Always check the suggested route for safety before following it. Autoroute is a planning tool and not a replacement for human judgement.

You can drag and drop waypoints to customise the generated route.
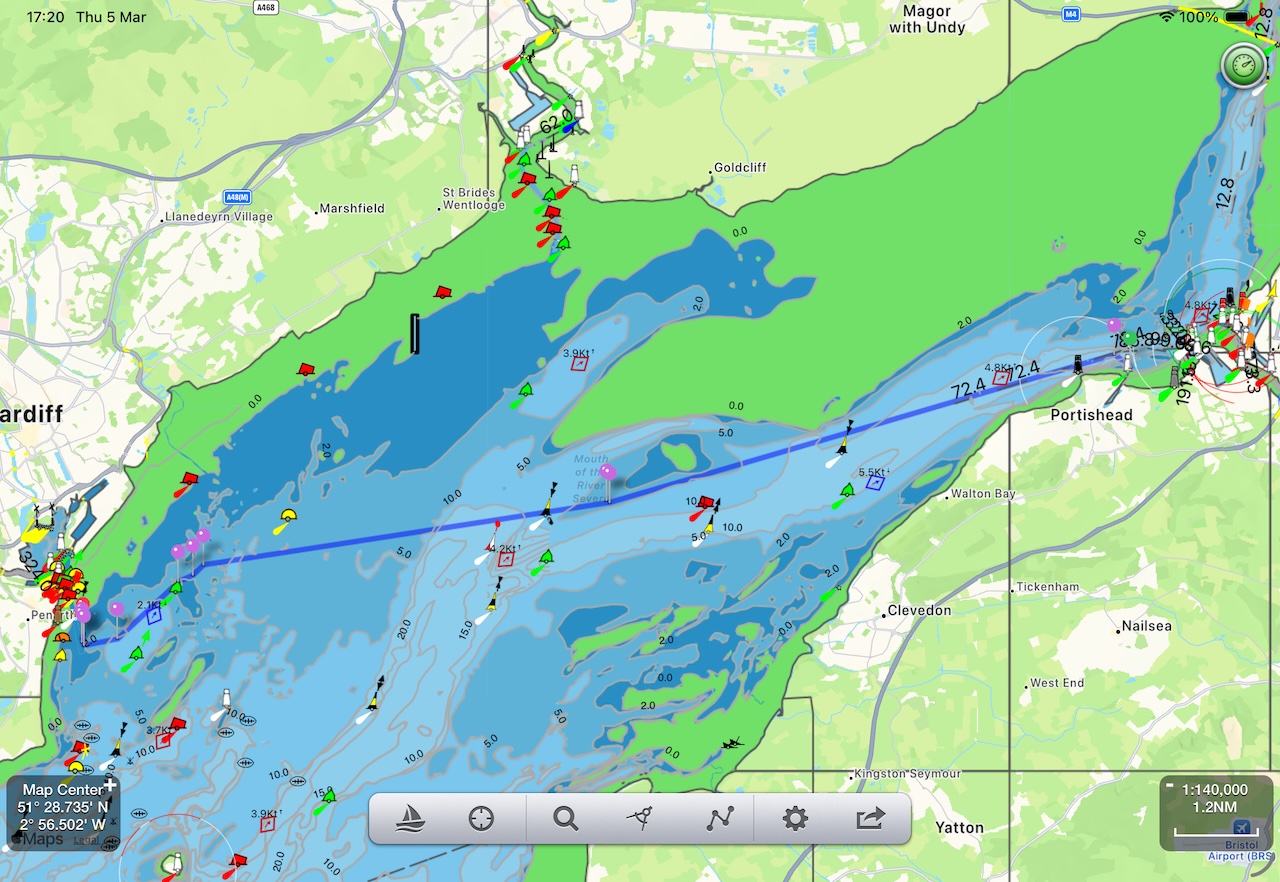
You can always tap autoroute again to have another go. Here is one we made earlier for a route from Portishead to Cardiff in the Bristol Channel. Spot on.


Sometimes autoroute can fail to find a route due to shallow depths, obstacles, narrow passages or even make a crazy route. Humans are still better than machines – thankfully. Moving the endpoints into deeper water, breaking the route down into shorter sections or moving the end points nearer together and re-tapping autoroute can solve this in most cases. If you are near the ICW on the East coast of the US, Autoroute will offer to use that.

Bridge narrows, lock entrances, and very tight tidal gates are places where chart data precision and autoroute resolution can conflict. The right approach is to place a manual waypoint at the exact gate/gap. autoroute then handles each open-water segment on either side.


Autoroute will ask for any missing charts for a route if you haven’t already downloaded them. This is a great way of making sure you have all the charts you need for offline use for a passage.


Please note:

  1. SeaNav autoroute is designed for open water routes and the Intracoastal Waterway (ICW) in the US. For the ICW we use Bobs423 ICW Tracks & Routes to help inform the routes. autoroute will not handle very narrow channels like canals & inland waterways.
  2. Routes can be shared and exchanged as GPX files for use with other Chart Plotters and by other SeaNav users.
  3. The SeaNav autoroute is based on the lowest astronomical tide. It does not take tides or tidal streams into account. Similarly SeaNav Autoroute does not look at weather or wind.
  4. As always, the captain takes full and sole responsibility for his vessel in using routes from SeaNav. Tides, weather, pilot guides and notes to navigation should be consulted.

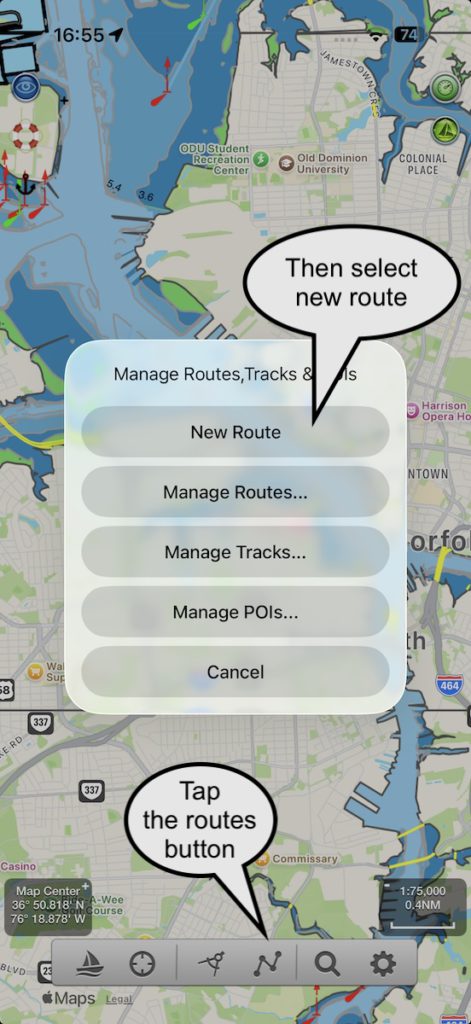
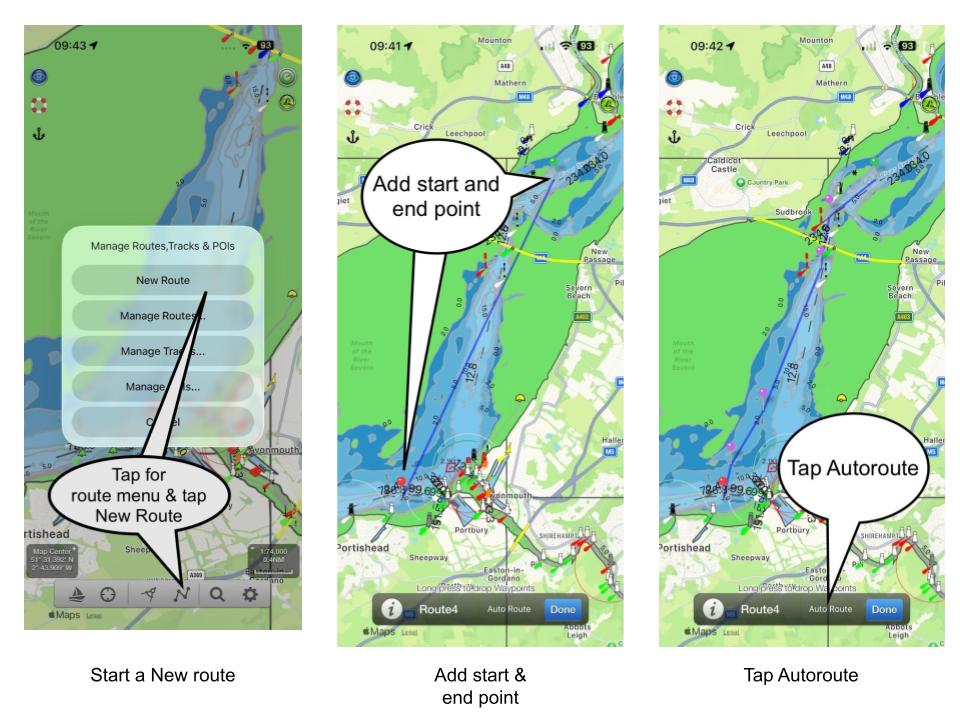
Here is a step by step guide to creating a route including the ICW on the East coast of the US. Tap the route button at the bottom of the screen and select “New route”. You can also long press anywhere on the screen and tap “Start new route from here”. We are starting in open water but our destination is inland on the ICW.

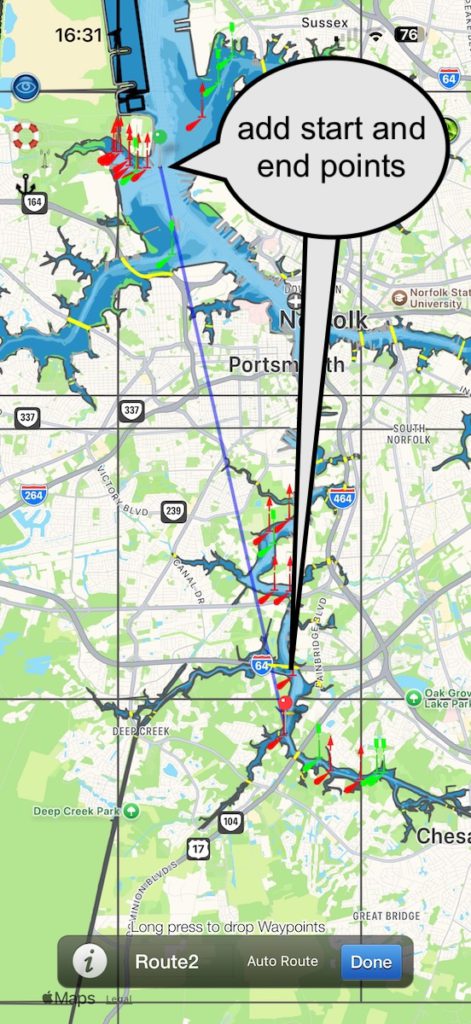
Long Press on the chart to add the Start and end points for your route

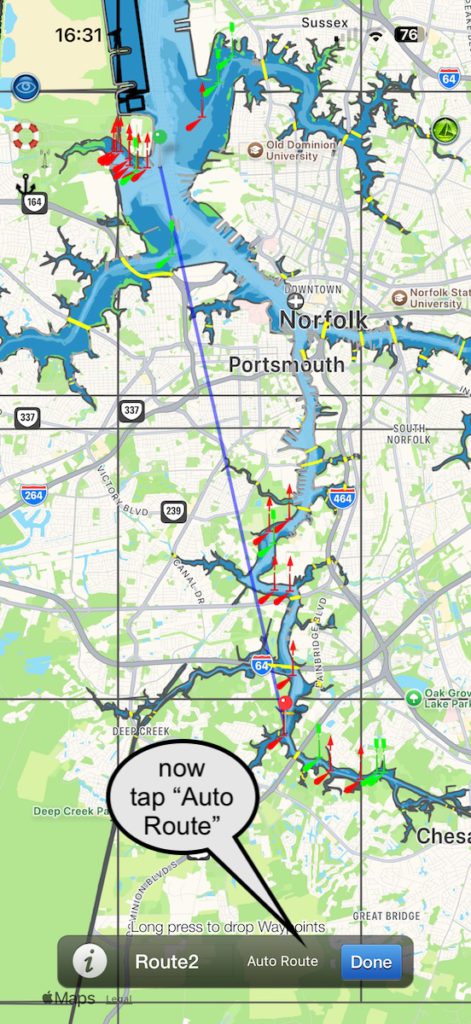
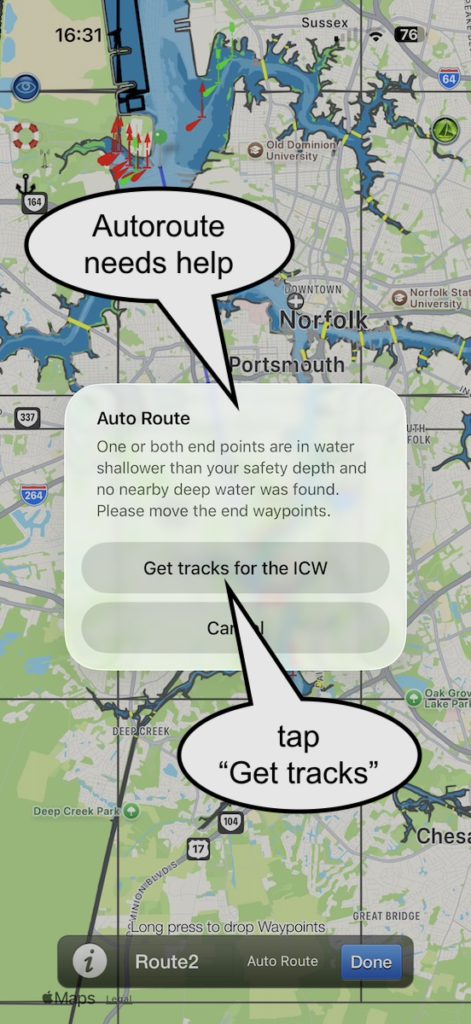
Next tap “Auto Route”

In this case Autoroute cannot find an open sea route but it spots there is an ICW one so it offers the ICW tracks. Tap “Get Tracks for the ICW”. If you have previously done this, SeaNav Autoroute will automatically find the track for you without you having to go and get them again.

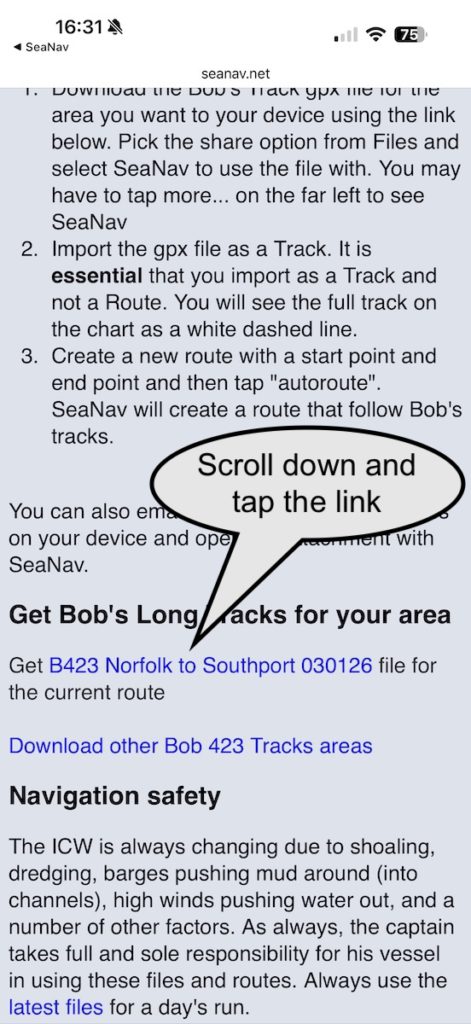
You will be taken to the SeaNav Bobs Tracks page. Scroll down to the link for the track for this section of the ICW. SeaNav will have automatically selected the correct track file for this route. If not you can browse the list of tracks via the link to Bobs Tracks download page.

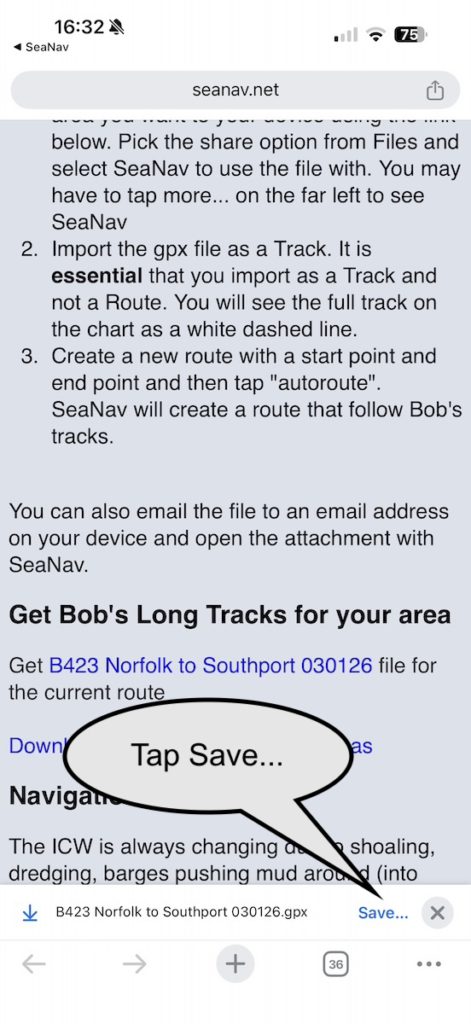
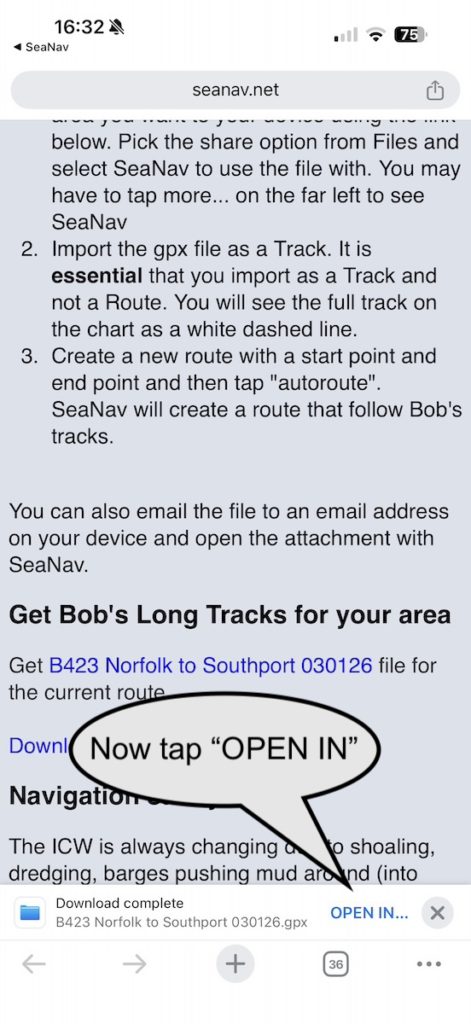
The track will download and a Downloaded prompt will show at the bottom of the page. Tap Save and Save to files and then tap Open In

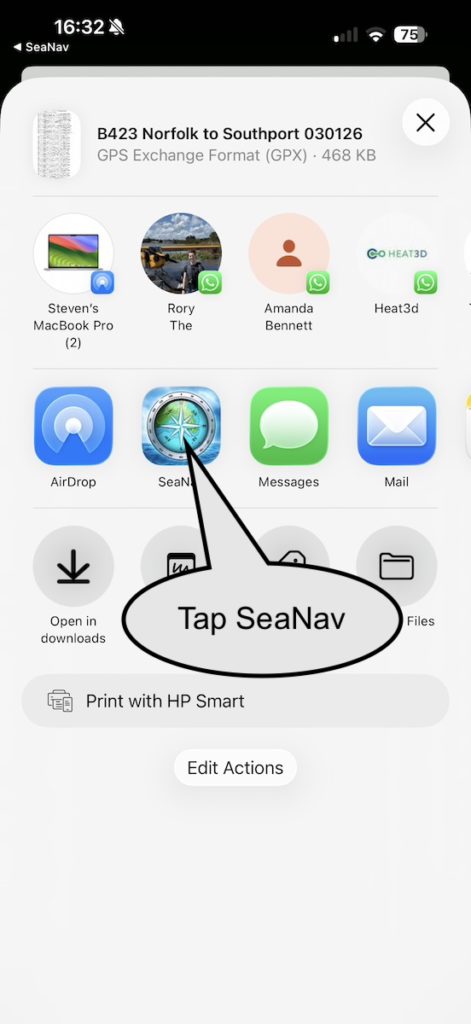
You will be shown a list of Apps to open the file with. SeaNav should be in the icon list – if not scroll to the right and select SeaNav after tapping More…Tap SeaNav

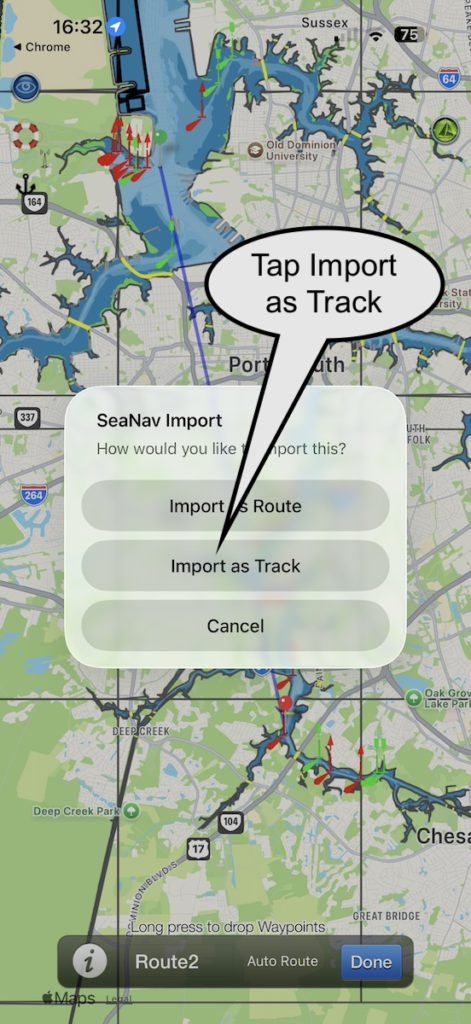
SeaNav will re-open and offer how to use the Bob’s track. Tap “Import as Track” (this is essential – you do not want a route created directly from the Bob’s track as this would have far too many waypoints).

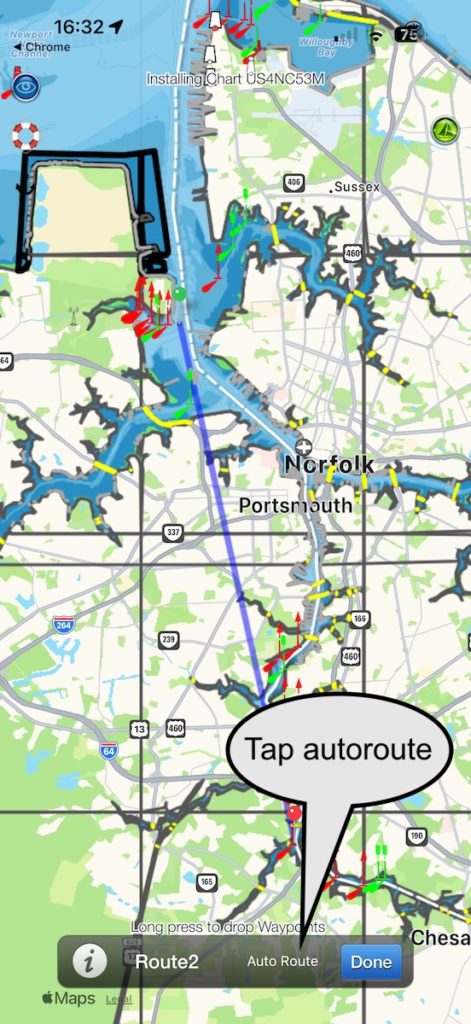
The track will show on the map as a thin white dashed line – it will be the whole track from Norfolk to Southport. Next tap “Auto Route” again and SeaNav will use the track to guide the route.

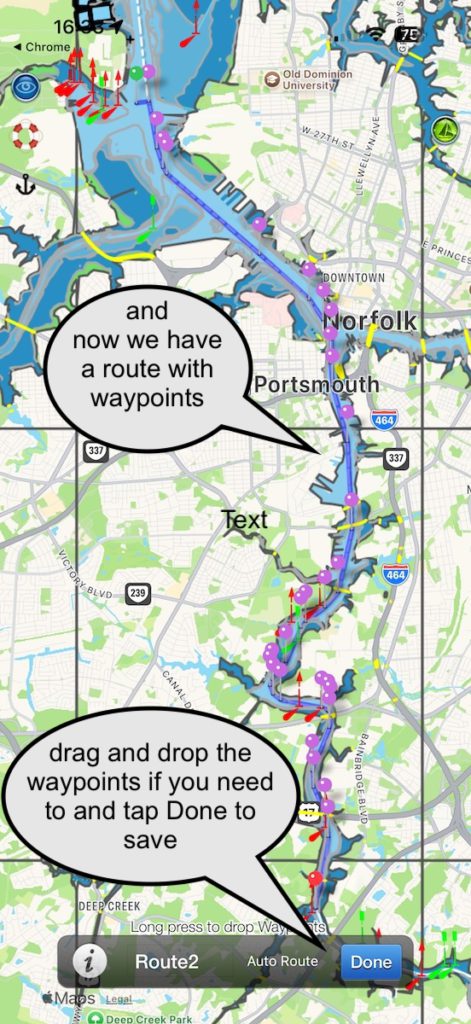
Now you have a route

You can give the Route a name (type over Route2) if you want to now or edit it later via Manage Routes. Tap Done and you can now use the route. Tap the Sailboat icon bottom left to start sailing it.

You can hide the white track by tapping the Routes menu, Selecting Manage Tracks and turning off the Norfolk to Southport track. When you start sailing the route the SeaNav HUD will give you the distances and a continuous update ETA to your next waypoint and to the end of the route based on your current speed. You can also check the total length of the route via Manage routes.

SeaNav and an autonomous boat

Read about the latest development with SeaNav and the autonomous boat here

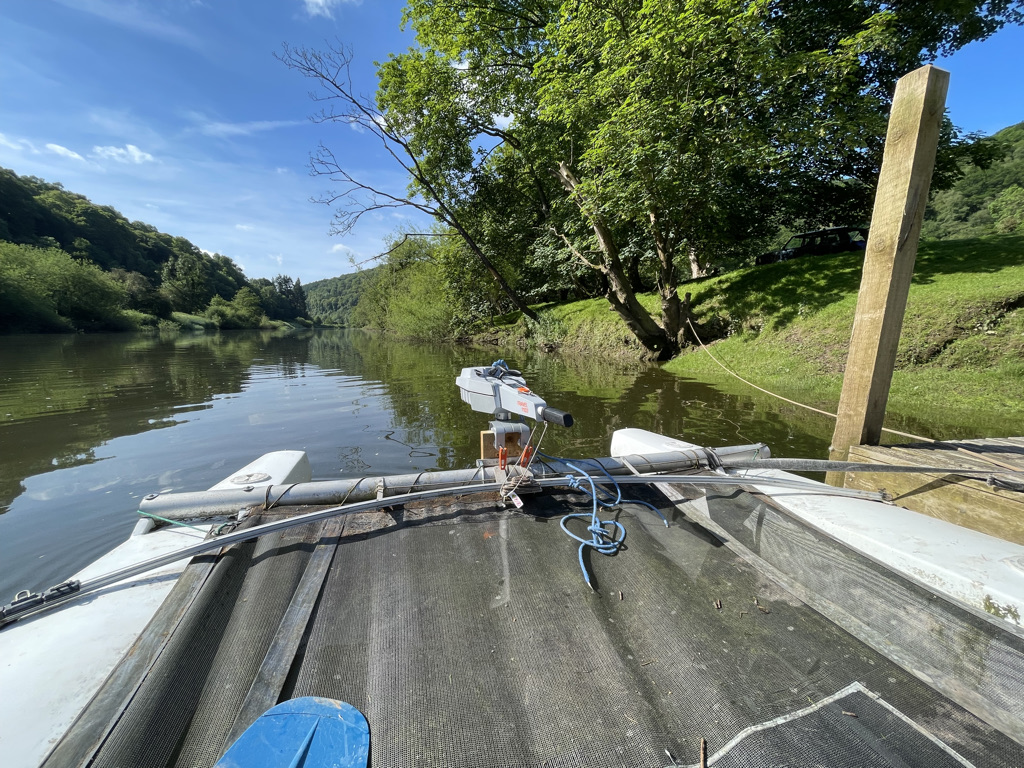
We have downsized the Pocket Mariner test boat from a catamaran cruiser to a catamaran dinghy (Dart 18) and are doing our bit for Net Zero and our ears with an electric outboard.

We chose the Torqeedo 1103C which has slightly more power than an e-Propulsion and also had the benefit of being available rather than on a 6 month back order. It is a revolution compared to a petrol outboard. Totally silent apart from the sound of water flowing past the hull, instant start, no oil or smelly petrol and fumes. A real joy, here is it in action on the river Wye:-

As well as using the test boat for testing our marine navigation apps we got inspired to take the boat to the next level and see if we could automate it and ultimately use SeaNav to control it to follow a SeaNav route.

Two steps:-

  1. A bluetooth LE enabled autohelm attachment to control the outboard direction
  2. Add the bluetooth driver capability to SeaNav and get it to maintain course and change course at Waypoints.

A possible 3rd step is to add a remote throttle control too so we can go fully autonomous!

This article covers step 1.

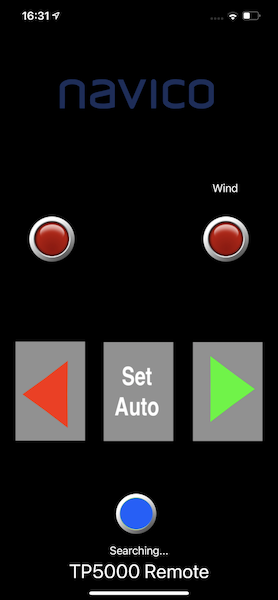
Step 1. Bluetooth iOS remote for Navico TP5000

Autohelm units are very expensive ( over £400) and none offer remote bluetooth control. We couldn’t find one that supported remote NMEA0183 control either. So we bought a second hand Navico TP5000 unit off eBay and adapted it to support Bluetooth using an Arduino BLE nano33 board and 3 relays attached inside the housing to the switches. The project design, instructions and code is here https://github.com/electricpocket/autopilot. This could also be adapted to control a Raymarine Autohelm unit.

Here is the Navico TP5000 in manual mode attached to the boat and Torqeedo outboard:-

and here is the TP50000 controlled with our iPhone autopilot app:-

Next is to test this on the water and then move on to Step 2…..here

Please contact help@pocketmariner.com if you have any questions or suggestions.

Tidal Streams for SeaNav

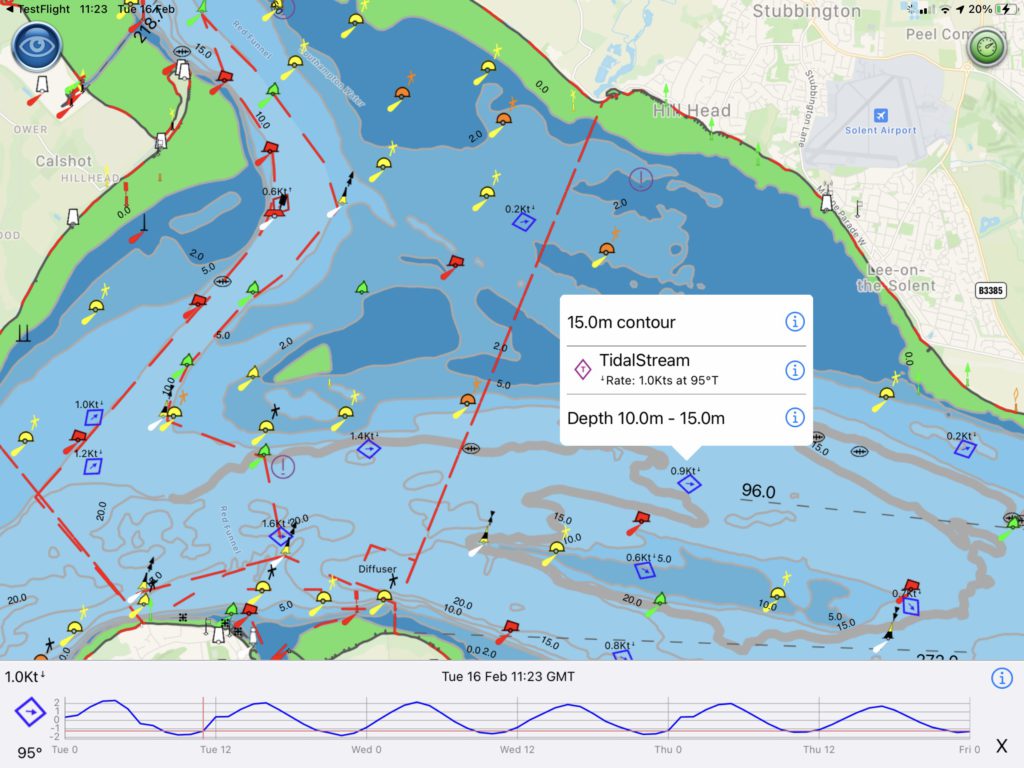
You can now view the current and predicted tidal flow rates and directions live on SeaNav’s UK and IE vector charts.

We use the official chart Tidal diamond symbol, rotating it to point in the flow direction. Blue means the rate is decreasing, red and its increasing. The diamonds update in real time on the chart. For planning tap on a tidal diamond to see the rate and direction, tap i for more information and see the rate and direction for the next 3 days on a graph at the bottom of the screen. Slide the time cursor ( or just tap at the time you want ) and all the tidal diamonds in view on the chart update as you adjust it (not just the one you have selected). You can zoom in and out of the graph timeline using pinch gestures. The Tidal Stream information is cached for up to 7 days so will work when you are out. of internet coverage as well.

The new Tidal Stream feature requires SeaNav 5.3 or later and uses official data from the UK Hydrographic Office, updated annually. A current UK & IE chart subscription is required to view the data. We hope to add Tidal Streams for other areas where available if they prove popular ( FR, NL & BE, DE… ). Please email us and let us know.