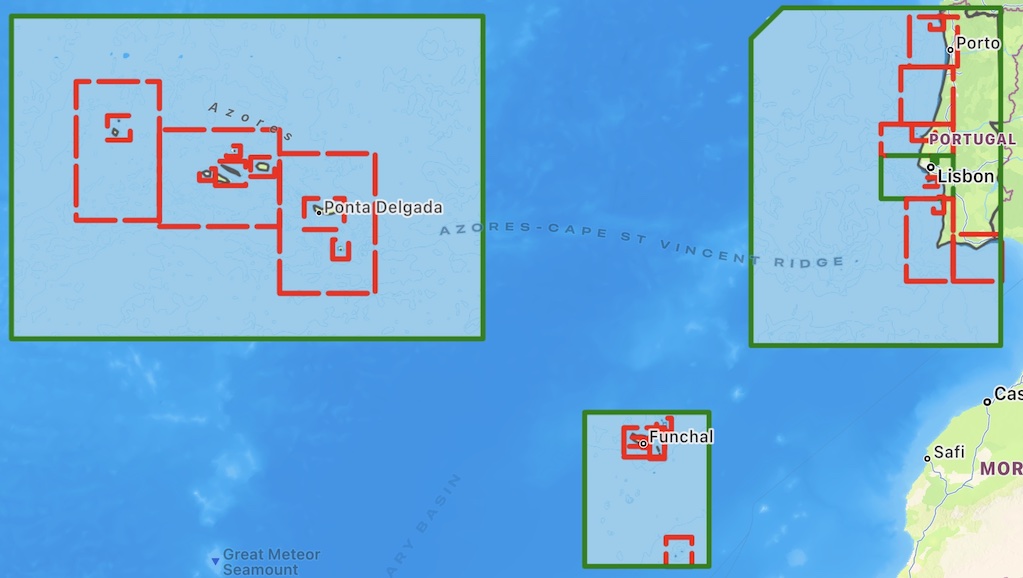
SeaNav now has vector charts available for Portugal, The Azores and the Madeira islands based on the latest official Hydrographic Office data. These work seamlessly together with the existing charts for Spain and France. The charts include the full range of scales down to harbour approaches.
You can download the new Portuguese charts now by going to Settings in SeaNav and selecting SeaNav Chart Store/Portuguese Charts.
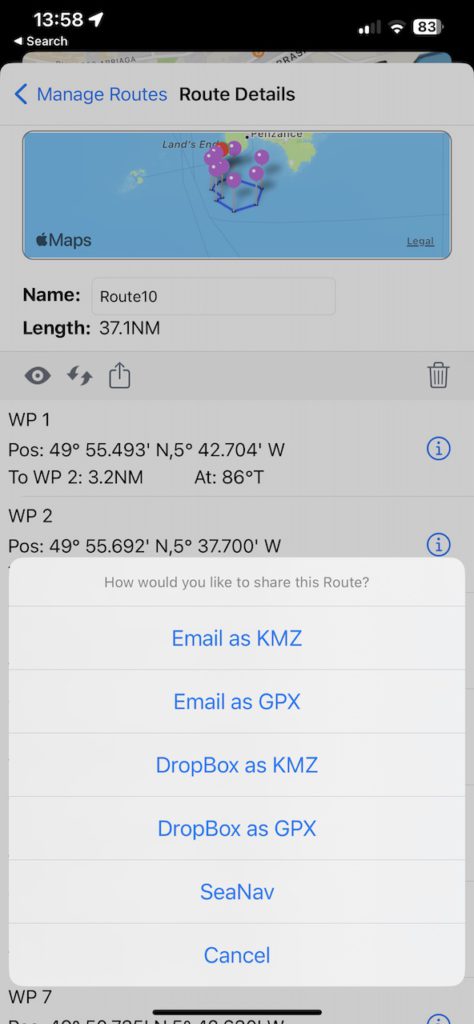
The simplest way to share a route with one of your other devices is to export a route via email to an email address you can read on the other device. The other way is to use Dropbox if you have a Dropbox account. Dropbox is bit more “automatic” once you have logged in and lets you browse your saved routes.
This article explains how to do it via email.
Tap the “zigzag” routes icon on the bottom toolbar and select Manage routes. Select the route you want to export by tapping the i button on its right. Then tap the share icon on the left toolbar ( square with arrow pointing out of it). Select Email as kmz and then fill out the email address to send to.
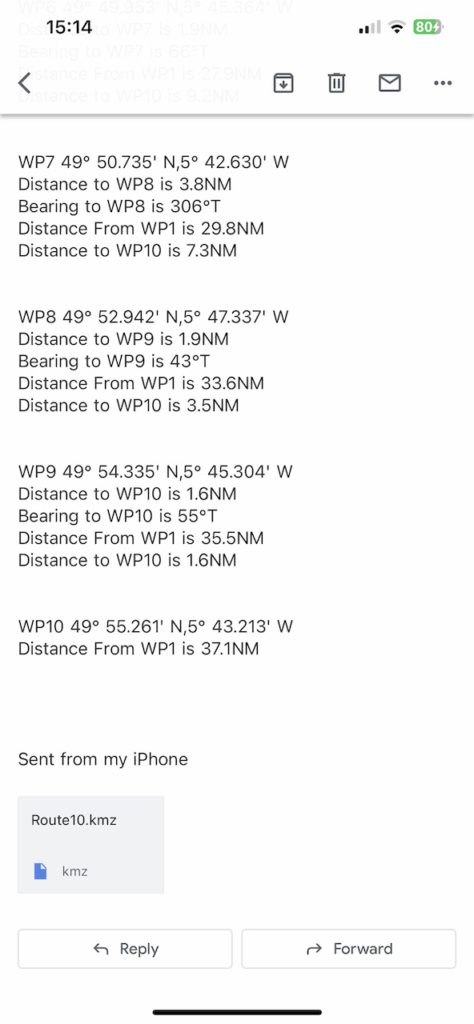
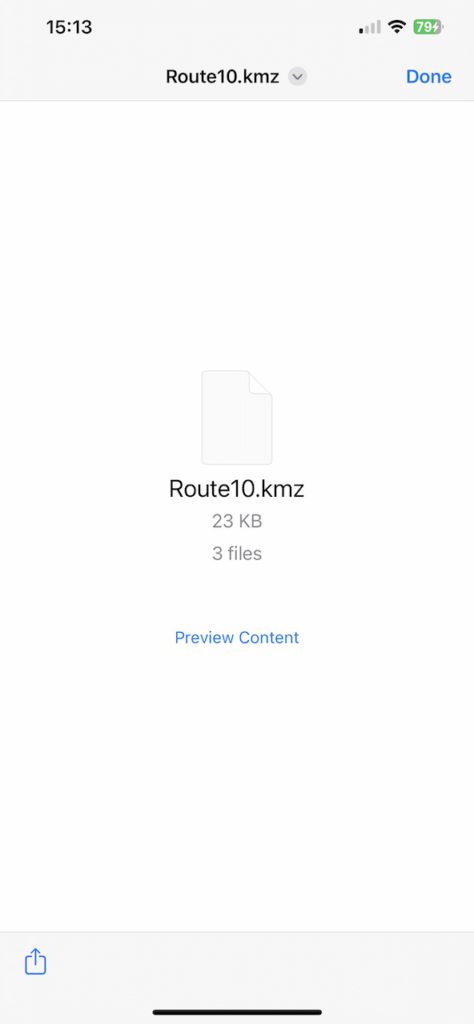
Open the email on your other device. When you open the email there will be a kmz file attached at the bottom of the email. Tap the kmz file image to download it
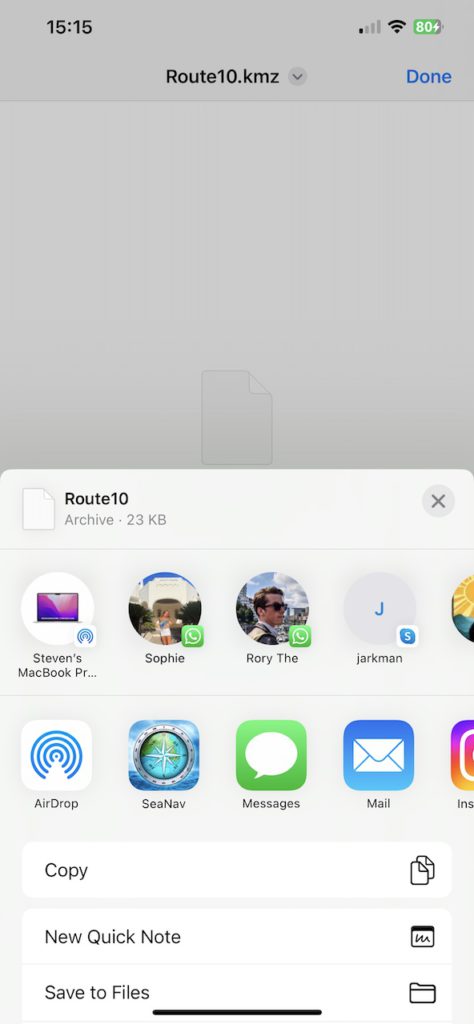
and then tap the share button bottom left to open it (2) .
Choose what you want to open the download with – scroll along or tap more if you can’t see SeaNav in the initial list of icons – choose SeaNav and it will import it and open SeaNav on the new route.
As the new boating season starts we have added a new, unique and useful feature for our popular Boat Beacon app – “Hey Siri, Man Overboard”
Boat Beacon now supports several Siri voice commands which you can use with your device or on your Apple Watch (requires iOS 12 or later and WatchOS7 or later). This lets you use Boat Beacon’s features hands free. The current list of voice commands are:-
“Man Overboard “- Toggles Marking and tracking a man overboard position with Boat Beacon
“Start Sailing” – put Boat Beacon into “On boat” mode. Same as tapping the Sailboat icon bottom left
“Finish Sailing” – Turn off Boat Beacon “On boat” mode.
“Drop Anchor” – Mark your anchor position and set a drift zone around it.
“Up Anchor”- removes the Anchor watch.
“Navigation status” – report current speed, course and heading.
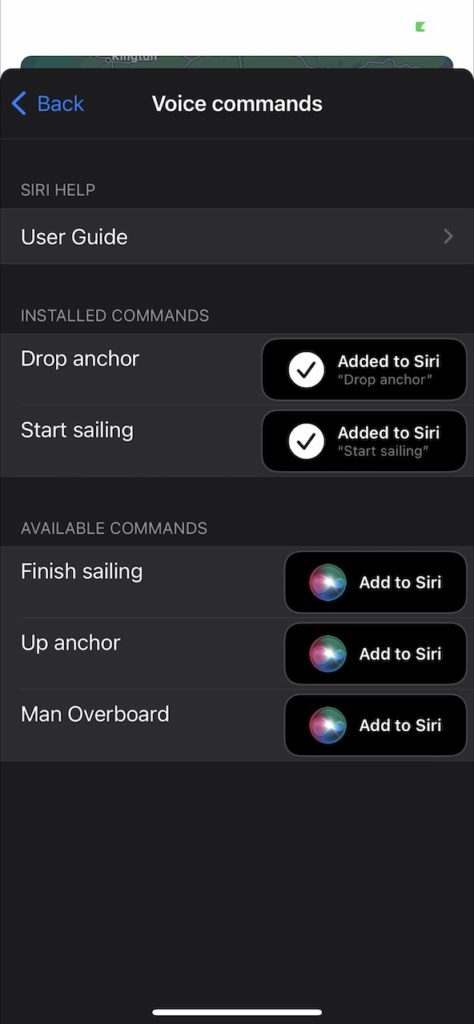
You can add the commands to Siri from the Boat Beacon app in settings or directly in the Siri App itself. They work directly with Siri without having to mention “Boat Beacon” in the command. You can also customise the commands to respond to your own preferred phrases or language.
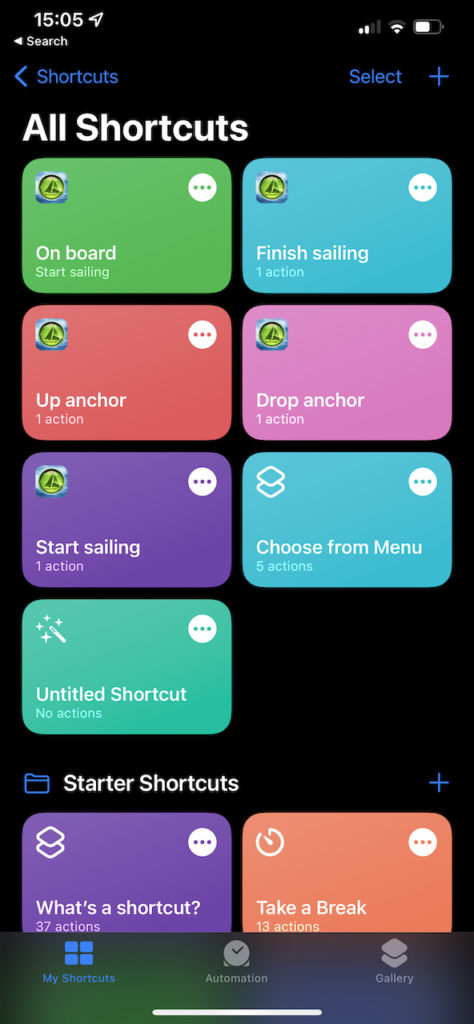
Tap the Add to Siri button in Boat Beacon settings to see the list of commands that are active and more that you can add. “Drop anchor” and “Start sailing” have been added in the screenshot. To add another command just tap its “Add to Siri” button. Once added you can ask Siri to do them at any time on your device or your Apple Watch.
You can also edit the commands that have been added by tapping the “Added to Siri” button next to them and add additional speech commands to launch them. For instance add “On board” as an addition/alternative to “Start sailing. You can type the phrase or enable dictation and speak it. Useful also for setting phrases in other languages or using alternative phrases that Siri finds it easier to understand.
You can view and delete the commands in the Siri Shortcuts app on your phone. Once added the commands work automatically on your Apple Watch, no more set up required. If you want to see them in the actual Siri app on your Apple Watch as well then you can set “Show on Apple Watch” in the Shortcut settings in the Siri app on your phone.
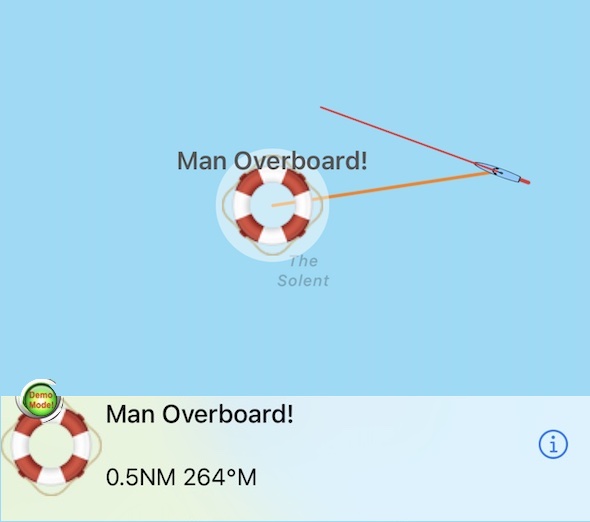
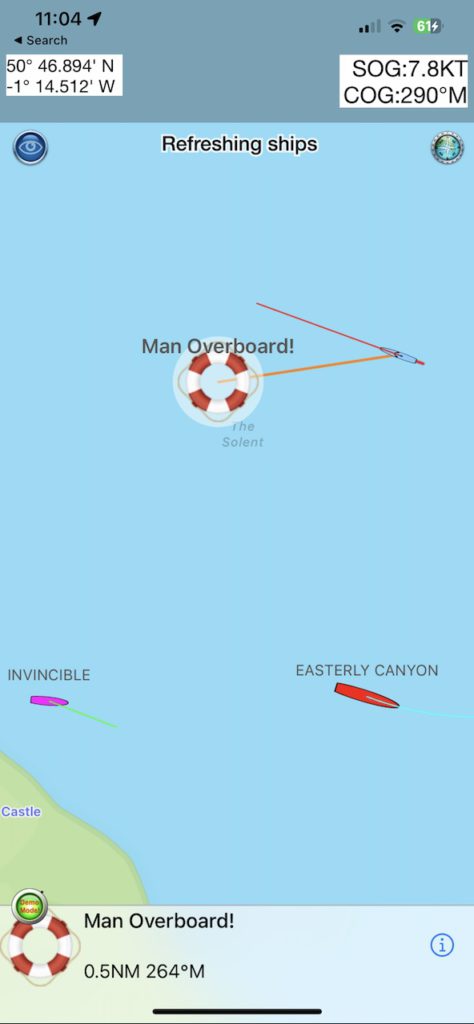
Try it now. Add “Man Overboard” and then say “Hey Siri, Man Overboard” to your iPhone/iPad or your watch. It will sound an alert, mark the position and start tracking it for you.
Say “Man Overboard” again to clear the alert. N.B. This will still leave Boat Beacon in sailing mode.
There is a User guide in the app and online here:-
Our ship tracking network uses a global network of shore and ship-based radio stations, which receive signals from the AIS system that ships use to broadcast their positions as they travel. Our receiver stations share the ship positions with our cloud-based data server, which pushes them onwards and out to our apps and web services.
We are continuously working on increasing the coverage of our real-time AIS receiver station network. During the last three months we have added more than 100 new AIS stations across 5 continents bringing our live ship coverage to over 80,000 ships. We have supplied the AIS receiver for free for many of these sites. New volunteers are always welcome to join our AIS Network.
Here is a list of the most recent stations we have set up and a snapshot of our global coverage Q1 2022
America
Hudson Bay, NJ
Sakonnet River in Rhode Island
St Lawrence Seaway
British Columbia
Miami, Florida, US (2 new stations)
Antioch, CA.
Stockton,CA
St Bartholomew (Caribbean)
Dominian Republic.
Buenaventura, Colombia.
Lake Erie
Several stations in Uruguay
Several stations in Mexico
Europe
The whole of Norway
The whole of Denmark
The whole of Finland
Scicily, Italy
Turku, Finland
Maasbracht, Netherlands
Ijsselmeer, Nethrlands
Ust-Luga, Russia
St Petersburgh, Russia
Edinburgh, Scotland
Over 30 new stations in and around Sweden.
Eastbourne, UK
Scilly Isles, UK
Isle of Man, UK
Lowestoft, UK
Alicante, SP
Faro, Portugal
Africa
Port Harcourt, Nigeria.
Canary Islands
Dakar, Senegal
Middle East
Kuwait
Dubai
Australasia
Perth, Adelaide, Darwin, Australia
Nagoya, Osaka, Inland Seas, Japan
Singapore
Indonesia
Ho Chi Min City, Vitenam
Sihanoukville, Cambodia.
If you are interested in adding coverage for your area, please read our Cover Your Area information – we can often provide the equipment free of charge.
The internal compass of your iPhone is a very useful tool. Unfortunately, it is very easy for the compass to become unaligned, particularly when indoors. The following are a few solutions to help improve the compass accuracy of your iPhone or iPad device.
Remove all Magnetic Material from your device
Your iPhone contains a Magnetometer that is used by the internal compass. Any interference from a nearby magnetic source may affect the compass readings. Make sure to remove any nearby magnets. Keep in mind iPhone cases and pop sockets often have magnetic parts built in. If your device becomes unaligned due to the magnet then removing the source will help but you may need to restart your device.
Rotate Your Phone in a Figure 8 Motion
One of the calibration methods your compass utilizes includes motion over time, whether you are walking around or pulling your phone out of your pocket. One trick to help re-align the compass is to shake your phone or rotate it in a large figure eight motion. For a small misalignment this will often help fine-tune the accuracy of your compass.
Enable Compass Calibration in the settings app
In iOS 13 and later there is a privacy setting to allow your compass to use location services to help calibrate your devices compass. By default, this setting is disabled. Enabling this feature is highly recommended for good compass accuracy.
Open the “Settings” app
Tap “Privacy”
Tap “Location Services”
Tap “System Services”
Enable “Compass Calibration”
Disable and Re-enable Location Services
Refreshing Location Services can help your device clear any GPS errors from previous readings. Another trick to improve compass accuracy is to simple disable and re-enable Location Services.
Open the “Settings” app
Tap “Privacy”
Tap “Location Services”
Disable and Re-enable “Location Services”
Restart your iPhone
When your compass becomes misaligned sometimes the fastest method of realignment is to simple restart your device. This may seem tedious, but it is the quickest and most reliable method for restoring your compass to provide optimal readings.
By default, your device will utilize True North for all compass readings. Depending on the compass reading you are trying to get it may make sense to temporarily disable True North and use Magnetic North for a while.
Open the “Settings” app
Scroll down and tap on the “Compass” app
Disable “Use True North”
Hopefully some of these tips help you attain accurate compass readings from your device. If your device continues to have issues, there may be an additional software or hardware problems with the phone itself. Please contact Apple Support for any questions about calibrating your compass or to determine if your device may need repair.
Read about the latest development with SeaNav and the autonomous boat here
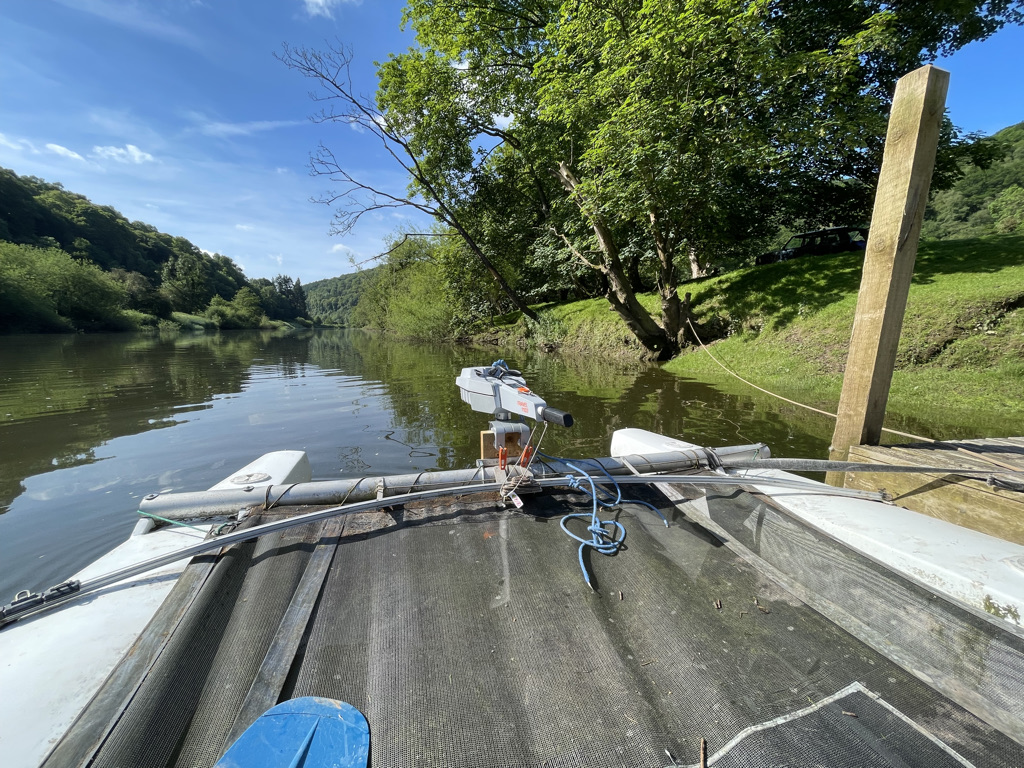
We have downsized the Pocket Mariner test boat from a catamaran cruiser to a catamaran dinghy (Dart 18) and are doing our bit for Net Zero and our ears with an electric outboard.
We chose the Torqeedo 1103C which has slightly more power than an e-Propulsion and also had the benefit of being available rather than on a 6 month back order. It is a revolution compared to a petrol outboard. Totally silent apart from the sound of water flowing past the hull, instant start, no oil or smelly petrol and fumes. A real joy, here is it in action on the river Wye:-
As well as using the test boat for testing our marine navigation apps we got inspired to take the boat to the next level and see if we could automate it and ultimately use SeaNav to control it to follow a SeaNav route.
Two steps:-
A bluetooth LE enabled autohelm attachment to control the outboard direction
Add the bluetooth driver capability to SeaNav and get it to maintain course and change course at Waypoints.
A possible 3rd step is to add a remote throttle control too so we can go fully autonomous!
This article covers step 1.
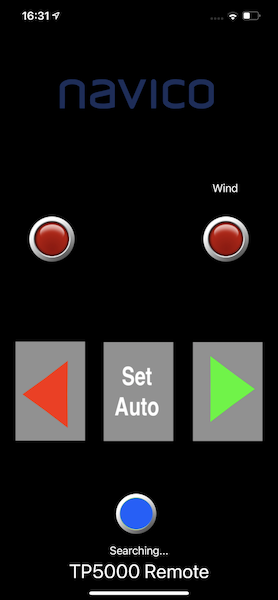
Step 1. Bluetooth iOS remote for Navico TP5000
Autohelm units are very expensive ( over £400) and none offer remote bluetooth control. We couldn’t find one that supported remote NMEA0183 control either. So we bought a second hand Navico TP5000 unit off eBay and adapted it to support Bluetooth using an Arduino BLE nano33 board and 3 relays attached inside the housing to the switches. The project design, instructions and code is here https://github.com/electricpocket/autopilot. This could also be adapted to control a Raymarine Autohelm unit.
Here is the Navico TP5000 in manual mode attached to the boat and Torqeedo outboard:-
and here is the TP50000 controlled with our iPhone autopilot app:-
Next is to test this on the water and then move on to Step 2…..here
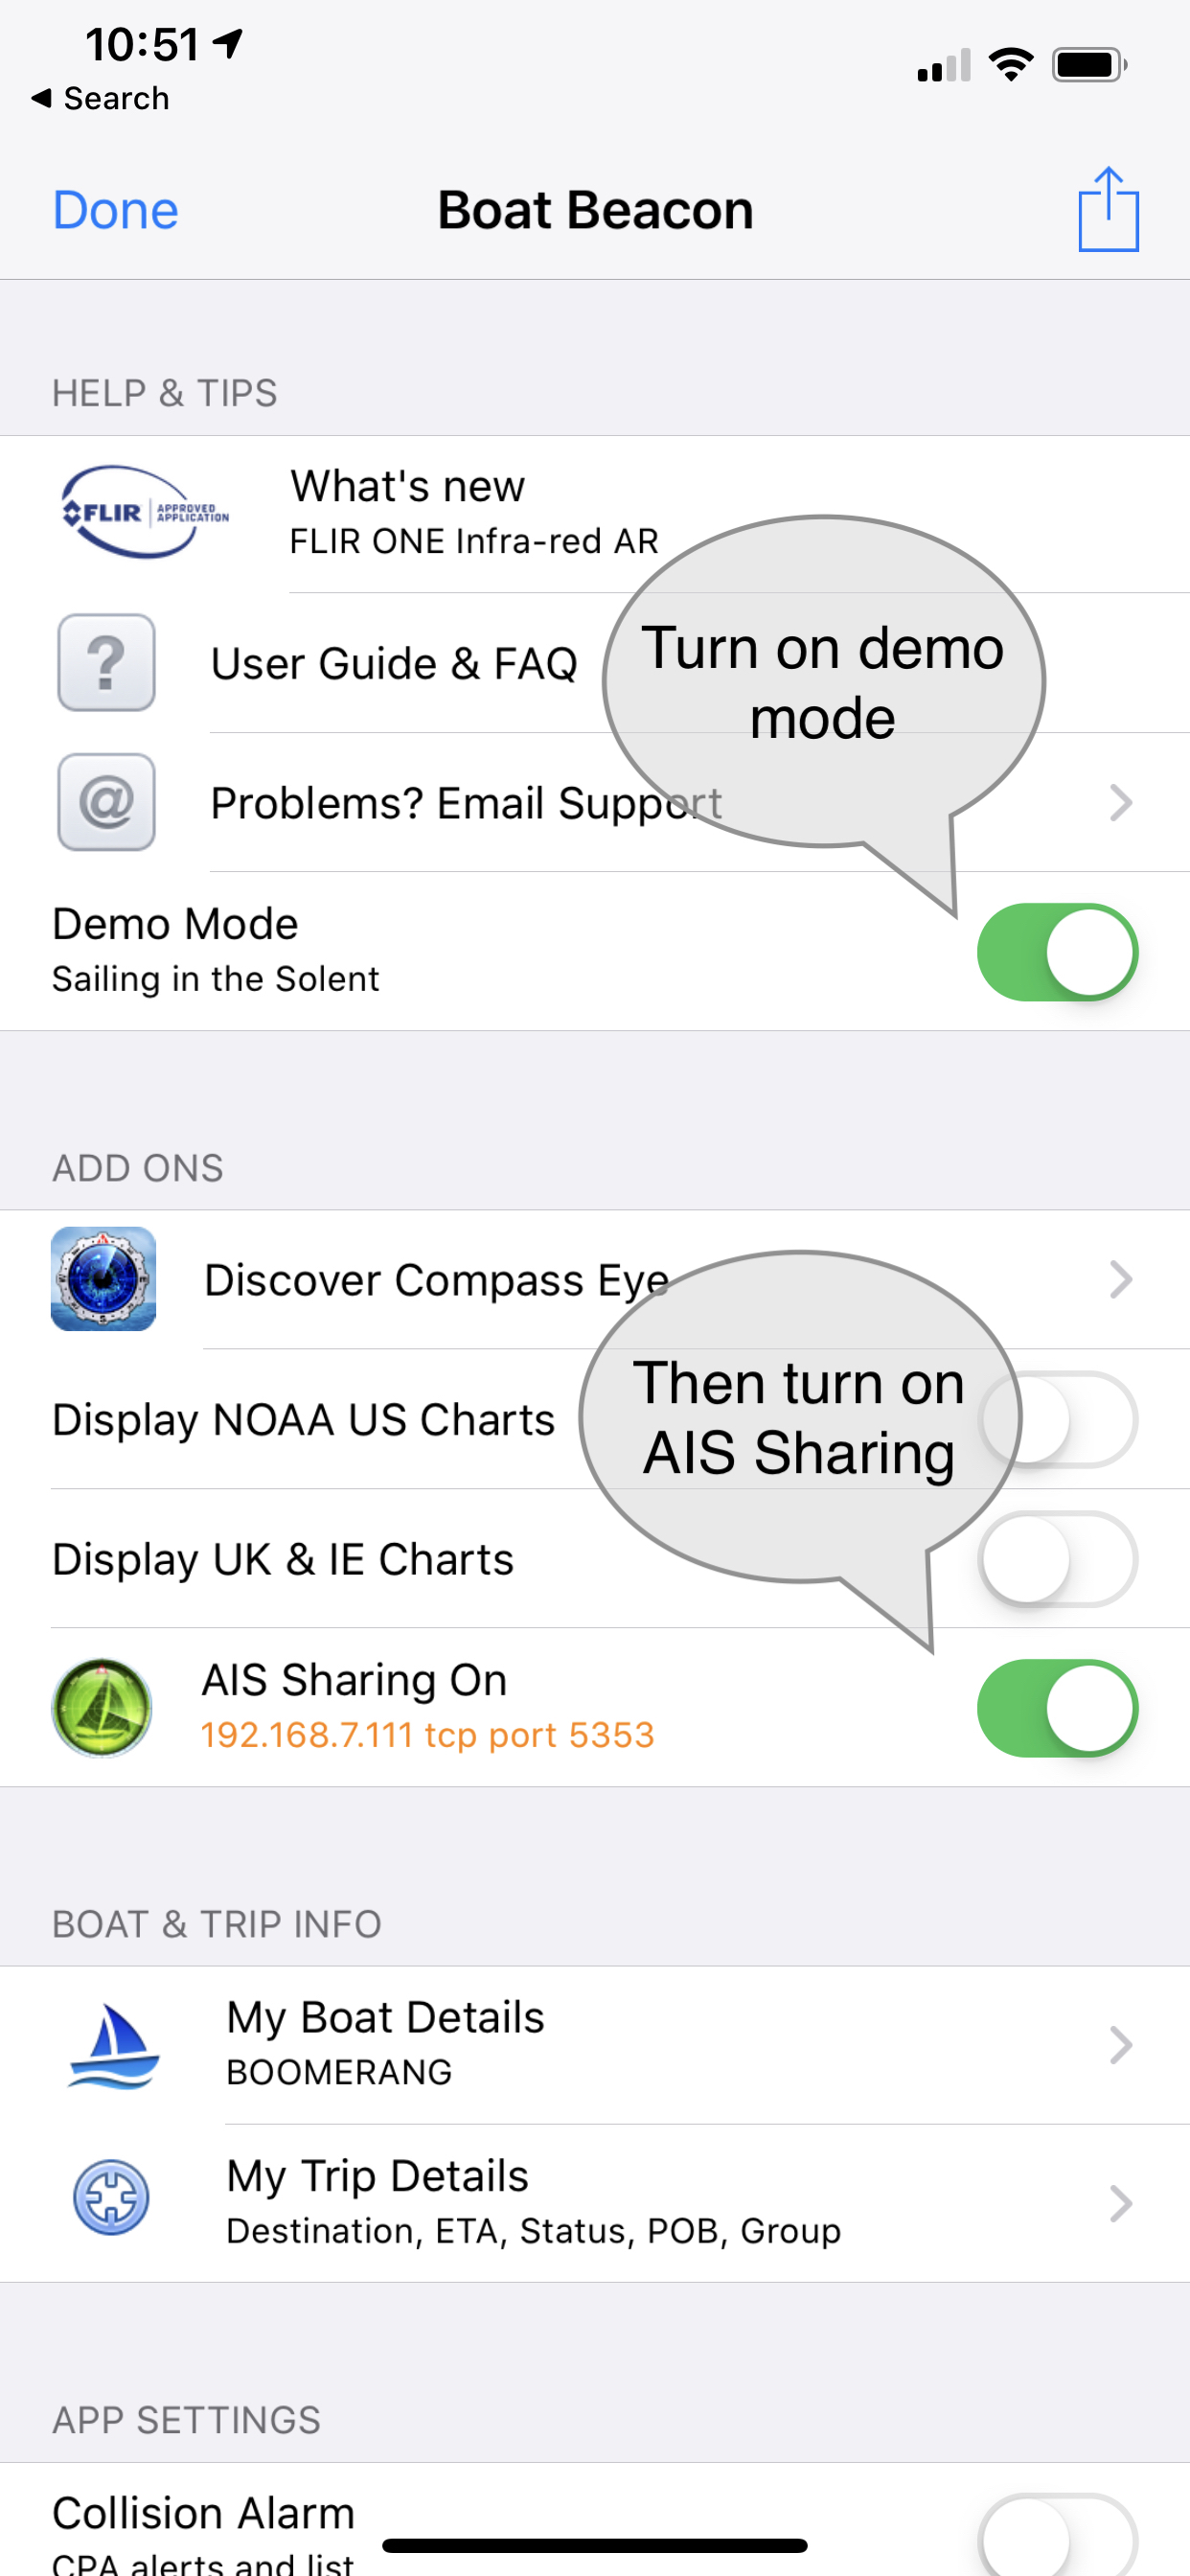
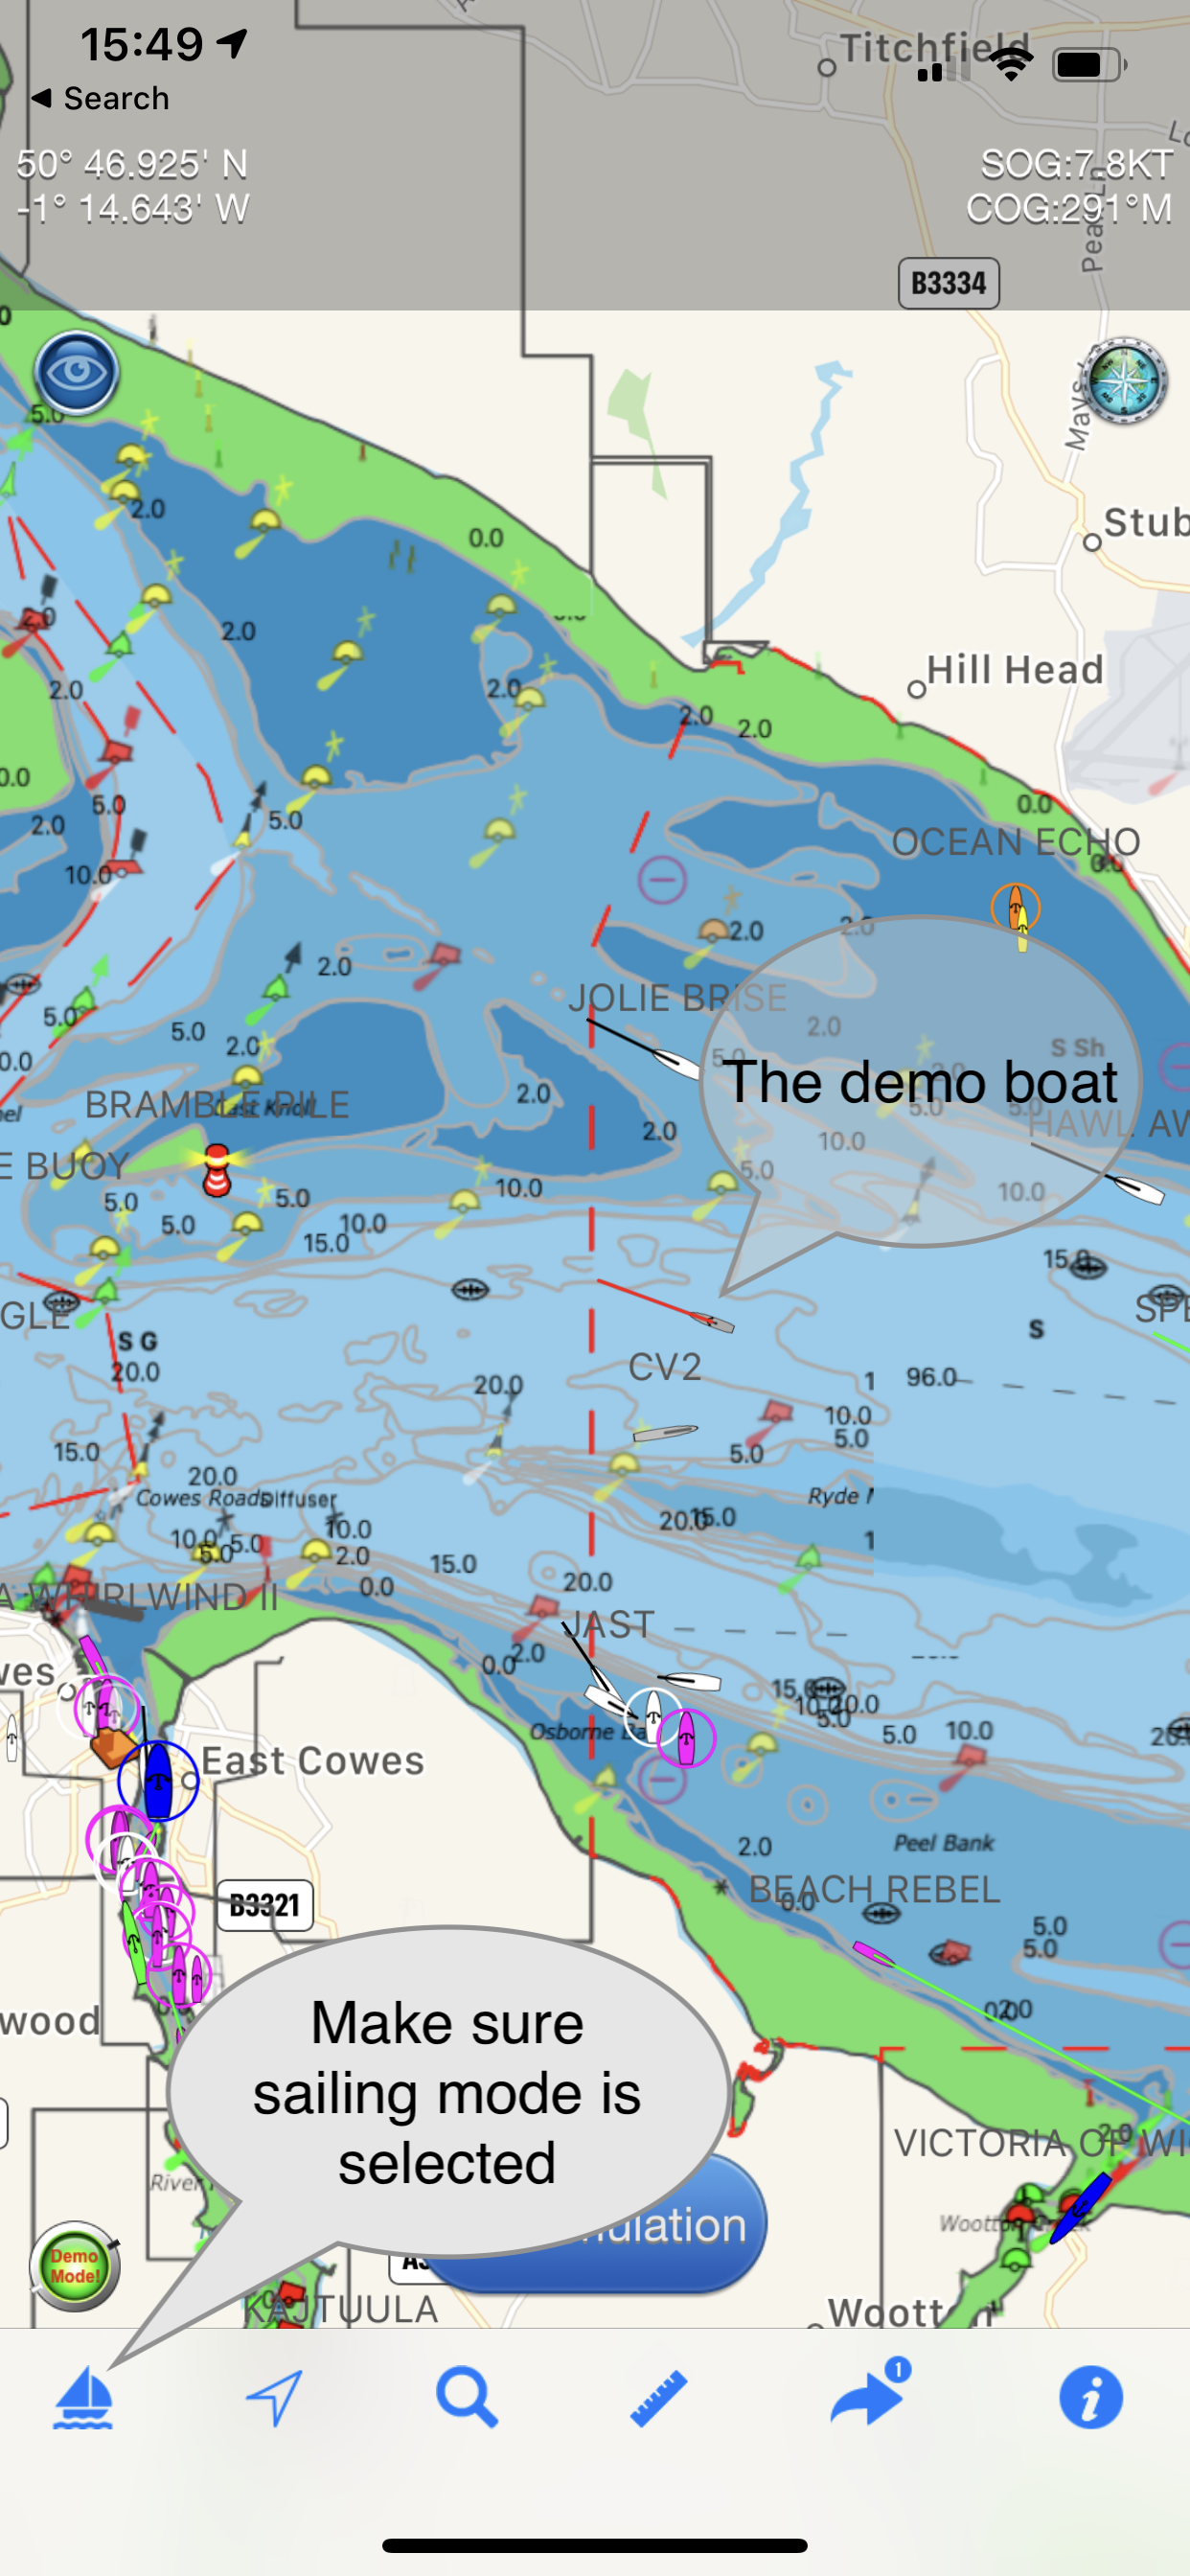
Get live AIS ship positions around you in the OpenCPN app on Windows, Mac, Android and RPi without the need for an AIS receiver. Boat Beacon can now share its real time AIS feed from our global AIS aerial network via NMEA with OpenCPN on the same device or on the same Wifi Network. Boat Beacon acts as a “Virtual AIS Receiver” and is the first and currently only app out there that offers this . The Boat Beacon AIS Share feature is free to try. If you find it useful you can use it any time when you are out boating for a small monthly or annual subscription via IAP. You can get the latest version of Boat Beacon from the Apple App Store here and Google PlayStore here. This is a step by step guide on how to configure Boat Beacon AIS Sharing on iOS (Android guide here) with OpenCPN running on a Windows PC or Mac. Boat Beacon and OpenCPN must be running on the same Wifi network or device. The guide uses Boat Beacon’s demo mode so you can try for free at home away from the coast and without having to purchase an AIS sharing subscription.
1. Launch Boat Beacon and go into Boat Beacon settings and turn on “Demo Mode”, then turn on AIS Sharing. It will show the IP address (192.168.7.111 in this case) and default TCP port number to use 5353 and will be orange ( not connected). Remember the IP address for use later in OpenCPN. N.B. If you are not in the UK the demo mode will be centred on San Francisco bay in the US.
2. Tap Done top left and go back to the chart view. This will position the map on a virtual boat in the Solent ( or San Francisco Bay). All the other boats in view are real and live. Tap the sailboat icon bottom left to start sailing the demo route.
3. Now switch to the OpenCPN app on your PC ( or Mac) and position the map on the same demo location as Boat Beacon, Solent ( or San Francisco Bay).
On windows click the Spanner icon to open the Options Dialog which has 6 tabs, as seen below. On Mac click Preferences under OpenCPN top left in the toolbar.
Tap Connections, Add Connection
Select Network, select TPC for the protocol, enter the Address (192.168.7.111) and DataPort number (5353) from Boat Beacon. You can enter a User Comment (e.g. Boat Beacon AIS) so you can distinguish this connection from any other connections you add. Leave everything else as default for now.
Tap Apply to save and create the new connection and you should see this with the new Boat Beacon connection enabled:-
The Settings are persistent, meaning that settings entered in one session will still be there on restart. The live AIS data from Boat Beacon will then display in OpenCPN.
Please note Boat Beacon will use your GPS position ( in non demo mode) to fetch and share the AIS data from (not the displayed map position) so OpenCPN will need to be centred on your GPS location too.
Notes:
Boat Beacon must be in Sailing mode to maintain the AIS feed when it is in the background ( e.g. when you are viewing the Navionics Boating app) on your device.
Make sure you have Location sharing for Boat Beacon set to “Always” in your device Privacy/Location settings. Please note Boat Beacon will only use your location when it is running ( foreground) or in Sailing mode. It will not “Always” use your location – it’s just an unfortunate terminology from Apple.
You must have an internet connection though (e.g. Cellular/Mobile) for Boat Beacon to receive the AIS data.
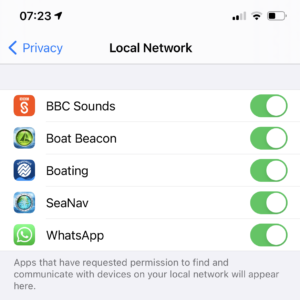
iOS14 has introduced a new privacy permission if apps want to use local network resources which both Boat Beacon and Navionics need to have set to yes. The OS will prompt you the first time either app tries to use a connection. You can manually set/change the permission in your device’s Settings/Privacy/Local network. See screenshot below for how we have it set.
Might sound obvious, but it has caught a couple of people out. You need to subscribe to the monthly or yearly AIS Sharing feature via IAP ( tap the AIS Sharing row in Settings to bring up the IAP screen) to use Boat Beacon with Navionics when not in demo mode.
If you have any questions or problems getting it working please email us at help@pocketmariner.com
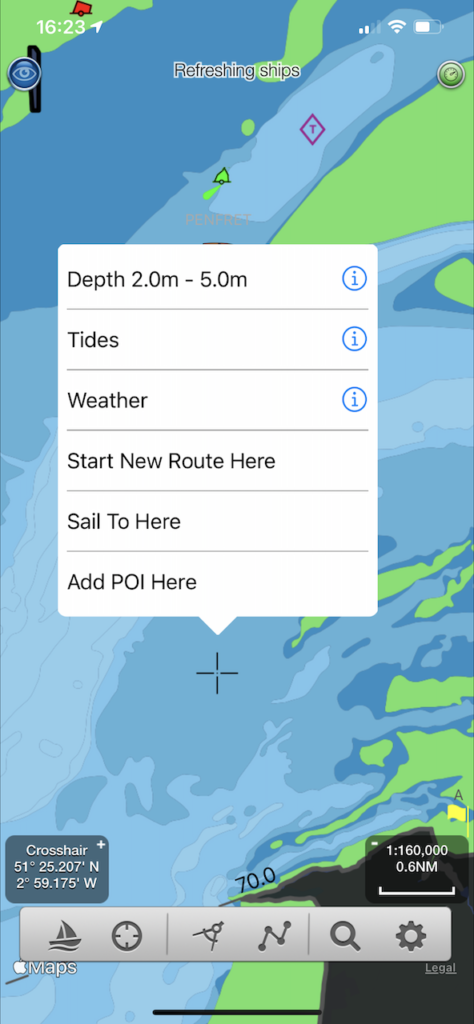
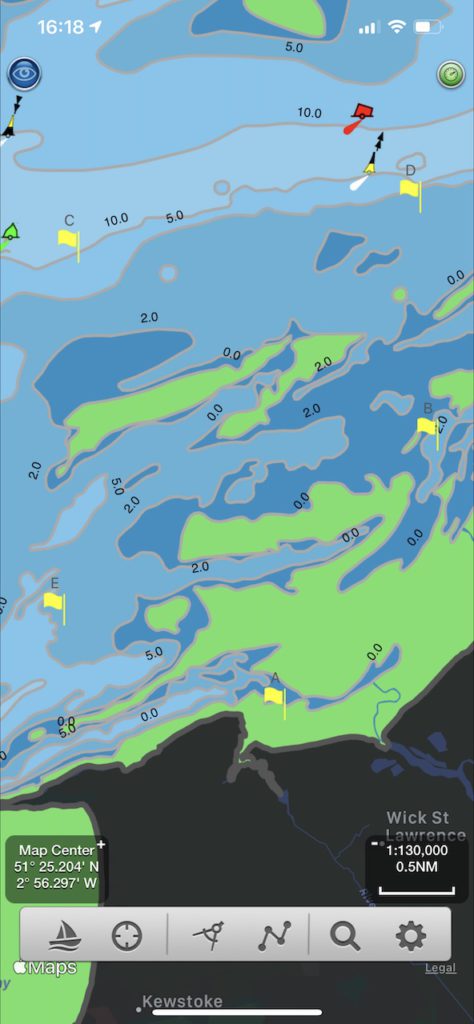
You can use SeaNav to enter and edit race courses, share these with others and navigate the course. Typically a club will have several race marker buoys and on any particular day set up a course using a subset of them plus possibly other fixed buoys in a particular order to best suit the conditions. This article shows you how easy and useful it is to do this using SeaNav in three easy steps:-
Ready. Enter all the race markers as POIs ( and use the SeaNav yellow flag race marker style). Typically you only need to do this once a year or less.
Set. Create a route from the ones you want to use as the course.
Go. Start racing the course.
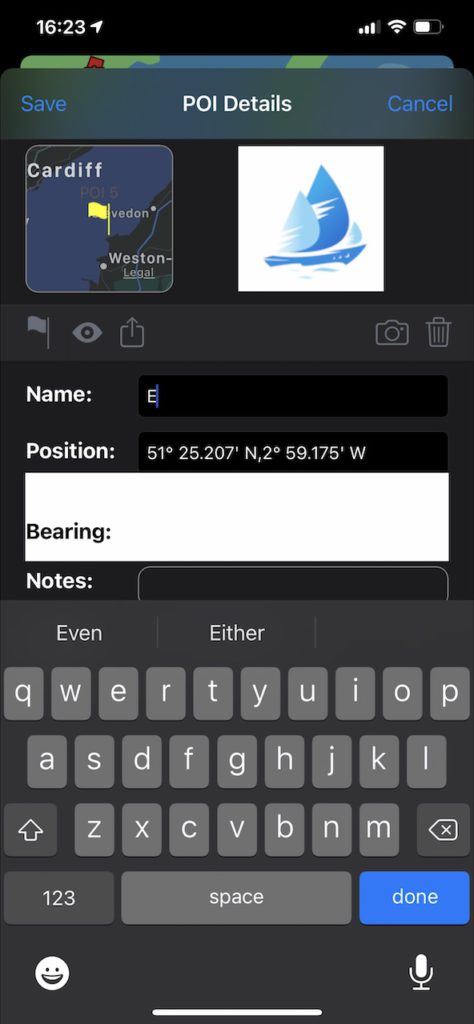
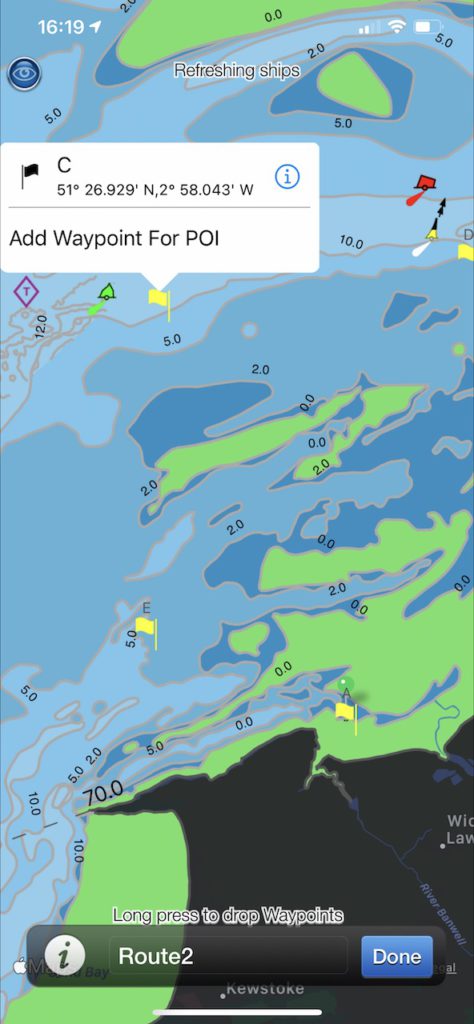
First step – Ready. Set up all the club’s race markers as POIs in SeaNav. For this example we will have 5 race marker buoys labelled A through E. Create each one by long pressing on the chart and tapping “Add POI here”
You can enter the buoy name in the edit screen that pops up and also choose the marker type (icon on left above the name field) e.g a yellow flag for a race marker). You can edit the Position Lat/Long if you want to make it more precise/accurate. You can also import the markers from kmz files.
After adding all the race markers, which you typically only need to do once a season, the next step is to set up the course for the day.
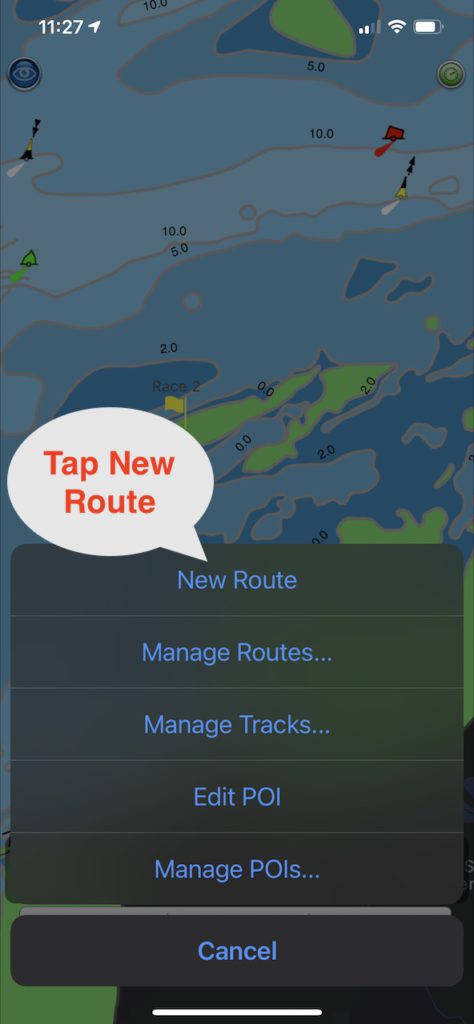
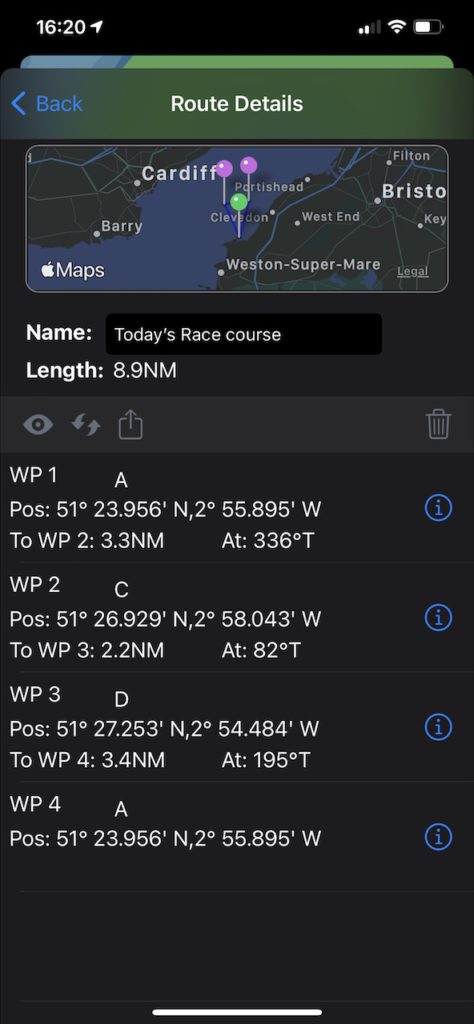
Second Step – Set: Enter the course as a New Route.
Tap the route/poi symbol on the bottom toolbar and then tap “New route”
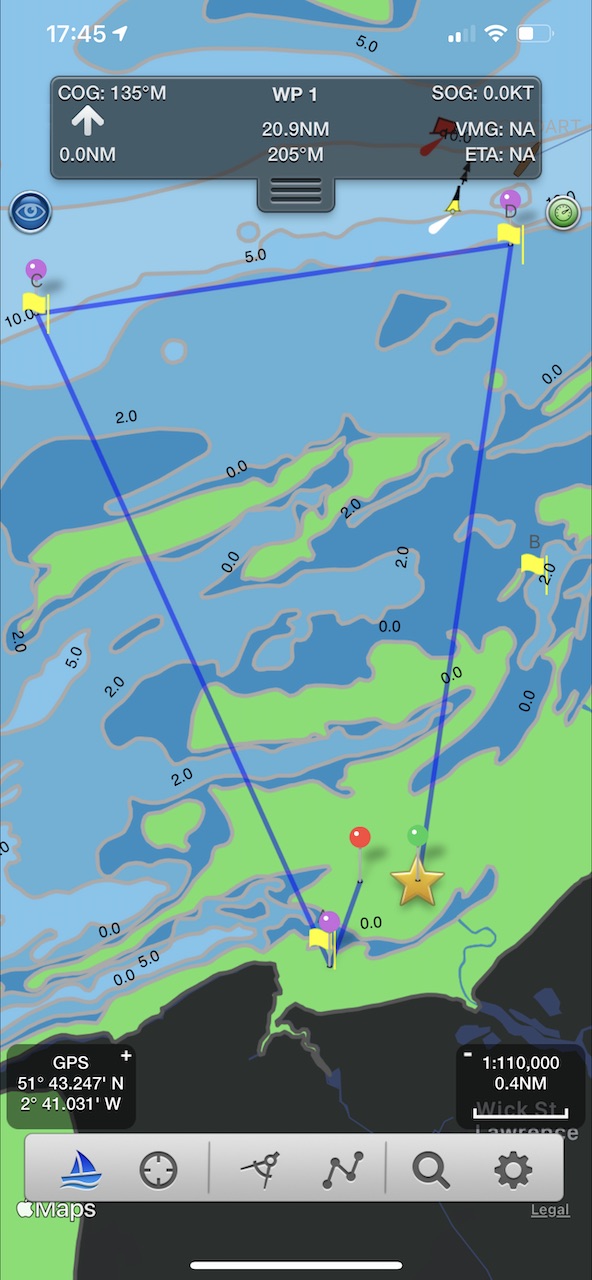
Enter a race start Waypoint or tap the POI race marker you want to be the start of the race and select “Add Waypoint for POI”. “A” in this example. Cycle through the rest of the markers in the order you want them adding them as waypoints . Here we are adding C and D and then ending back up at A.
You can end back at the start or at a different marker. You can set a race start/end line using a start and end waypoint markers. Enter a name for the course/route now or later in Manage Routes. Tap Done when you have finished. You can now share the route with others via email or dropbox and also send it to your own email as a back up. In Route details you can see the overall route length and distances between waypoints.
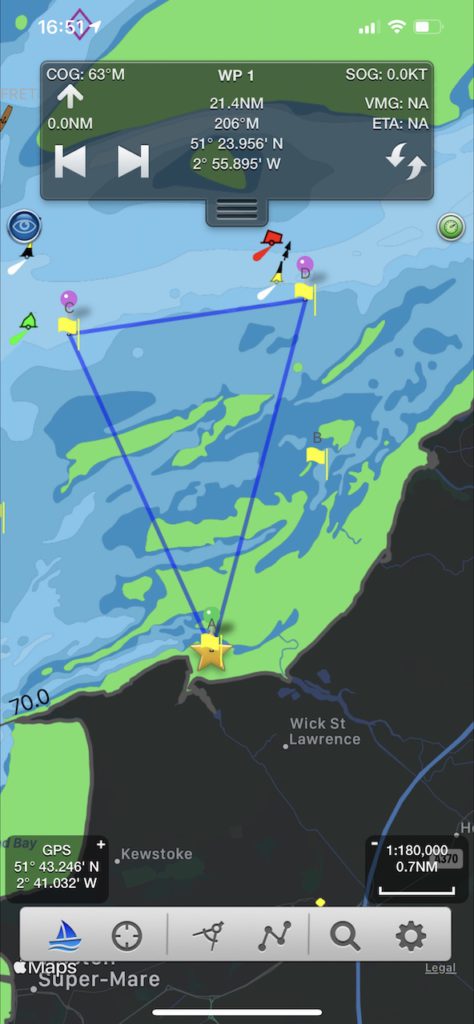
Final Step – Go: To start sailing the course just tap the Sailboat icon bottom left. It will mark the first course mark of the race with a star and show you the distance, bearing and ETA to it. When you reach it, SeaNav will automatically set the next race waypoint for you. You can manually choose the next waypoint in the route using the forward and back tab arrows in the navigation HUD at the top of the screen.
We are constantly working to increase our real time AIS coverage for our apps and services. Over the last month we have added over 30 new areas adding an additional 5000 live AIS targets to our global total of over 75,000 per hour.
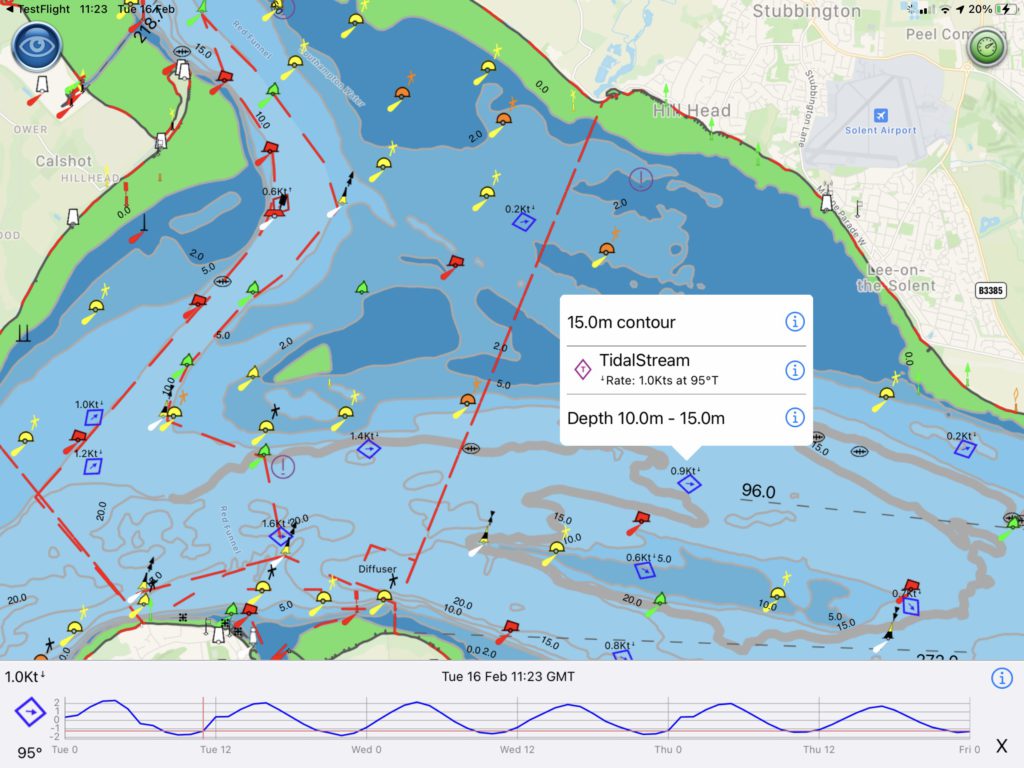
You can now view the current and predicted tidal flow rates and directions live on SeaNav’s UK and IE vector charts.
We use the official chart Tidal diamond symbol, rotating it to point in the flow direction. Blue means the rate is decreasing, red and its increasing. The diamonds update in real time on the chart. For planning tap on a tidal diamond to see the rate and direction, tap i for more information and see the rate and direction for the next 3 days on a graph at the bottom of the screen. Slide the time cursor ( or just tap at the time you want ) and all the tidal diamonds in view on the chart update as you adjust it (not just the one you have selected). You can zoom in and out of the graph timeline using pinch gestures. The Tidal Stream information is cached for up to 7 days so will work when you are out. of internet coverage as well.
The new Tidal Stream feature requires SeaNav 5.3 or later and uses official data from the UK Hydrographic Office, updated annually. A current UK & IE chart subscription is required to view the data. We hope to add Tidal Streams for other areas where available if they prove popular ( FR, NL & BE, DE… ). Please email us and let us know.